Simplicity 8608 Hack in Bubble Satin Crepe

It's been a while... and part of the reason why is that I honestly needed a break after spending what felt like half a lifetime sewing (and hand hemming) this Simplicity 8608 hack. Luckily I think the finished thing is sort of beautiful and it's up on the Minerva blog now!

Now to find an appropriate occasion to wear such a luxe dress and... take a step back onto the everyday sewing wagon! I have plenty of plans lined up for my favourite sewing season - Autumn!


Thanks to Minerva for providing the fabric for this project. See the full review over on their blog now.

Stay in touch!


Trend Patterns TPC10 Wide Leg Flares

WOW I LOVE THESE FLARES! If you followed my Me Made May efforts then you're probably already aware of that fact. Anyway, I'm pleased to say that the full review of the Trend Patterns TPC10 Wide Leg Flares in this seriously luxurious chunky cord is now live over on the Minerva Crafts Blog!
Trend Patterns TPC10 Wide Leg Flares
I'm talking adjustments (there were many), muslins (I did two) and finishing the hem by hand (which took a looooonnng time) in the post! Read it in full here.

The 'legs for days' illusion 
Thanks Minerva Crafts for providing the fabric for this project!


Stay in touch!

A Parisian Paper Theory Olya Shirt Dress

After making the Paper Theory Olya Shirt in March, I vowed to make it again in a block colour to really show off the outrageously good construction/style lines... but it's just so hard to keep a word when the perfect fabric presents itself! 

Olya Shirt Dress
I at least half followed through on my promise to this fantastic pattern, this time making the dress version. Whilst I like my previous Olya Shirt, and had the most fun making it, it hasn't seen as much wear as I would've liked, in part because I just don't really wear shirts! I haven't seen as many people make the lengthened Olya Shirt Dress, but for me, it hands-down tops the shirt, with absolutely perfect proportions. 

Sacrés Coupons on Rue d'Orsel
Now let's talk fabric. This viscose twill is arguably one of my best fabric buys of all time and it's purchase perfectly rounded off the best long weekend spent with fellow sewists in Paris for #parissewcial. Jess, Roz and I were lucky enough that our cheap-Eurostar-deal hotel was located almost at the foot of the steps to thSacré-CÅ“ur, and even luckier still that it was in the centre of the local fabric district. Housed at the end of our street on Rue d'Orsel was my favourite of the bunch, Sacrés Coupons.

Lovely #Parissewcial crowd! Thank you Charlotte and Carmen for organising the best weekend!
Most of the fabric shops sold pre-cut 3m lengths, and it was often a case of digging through the mountains of fabric available. I was particularly reserved, only buying fabric I considered to be different to that I could get at home. For me, the unusual graphic and abstract prints are the rarest of fabric finds, so I was very lucky to grab a 3m length of this crazy printed viscose on our final morning (we ducked in Sacrés Coupons as the shutters opened, whilst on our way to catch the Eurostar home)! 

The last fabric in my case definitely demanded to be the first one sewn, and the weight and drape seemed perfect for an Olya Shirt Dress. It's definitely lighter than my previous shirt version, plus I used extra light interfacing for the placket/cuffs/collar and it's much improved - is it just me who stills struggles to pick the right interfacing for a project?

Front details
The most exciting sleeve/yoke detailing
Whilst the pattern of the fabric might detract from some of the garment's design details, it does make them even more exciting at close inspection. I talked all about the cool construction in my previous review, but I have to say, I still can't get over the wonder that is the sleeve/yoke square seam.


One big change I made this time was to entirely eliminate the breast pockets. Whilst their design is no doubt excellent, I found the pockets on my last version just didn't sit right across my fairly full bust - I ended up stitching them closed as they gaped during wear. I still stuck with the topstitching detail along the yoke, and I think overall it's made for a much neater wear/finish for me!

Back view
The length is great and really balances out the full sleeves - I'd even consider adding another inch or two to future versions. I'm also all for a skirt side split - I even skipped the bottom button to have a bit more movement in the front too (risqué)! 


I feel like I'm really gushing now, but this absolutely my dress of the summer and currently feels like my dress of full-hearted happiness. It was created in a lovely calm week off work, sewing at a slow pace, and the fabric holds memories of a dear weekend in one of my favourite cities, with my inspirational internet friends, new and old.


I fully recommend a viscose for the Shirt Dress as this has been the perfect pattern/fabric pairing. Now to commit to making a plain version, maybe in a very basic black or khaki viscose... one day! I have another piece of Parisian patterned viscose earmarked for the Paper Theory Zadie Jumpsuit next!

P.S. You may have also noticed, I got new hair, which somehow seems to improve all my outfits! My hairdresser works actual wonders!


Stay in touch!

Fibre Mood/Named/Butterick mega jumpsuit

If it isn't the permanent year of the jumpsuit/boilersuit for you, well it certainly is for me (the #sewtogetherforsummer ladies have made a challenge that truly speaks to me)! After the success with my first Fibre Mood Carmella, I started dreaming up all manner of hackable possibilities for the pattern. So here's my jumpsuit mega mash up, starting with Carmella and combining two of my other long time favourite (and also perfectly hackable) patterns.

Carmella jumpsuit hack!
I'll start by saying this was such a no think hack - no big adjustments, just taping my favourite elements of each pattern together. I swapped the slim legs of the Carmella out in favour of my absolute favourite Butterick B6178 Culottes in view D, simply lining up the grainlines/crotches of both pattern pieces. The B6178s have come in handy for a number of hacks (like this one and this one) mainly because they're so easy to just tack onto different bodices.

All my fave patterns pooled
The sleeves come from the Named Clothing Reeta Shirt Dress - again, another pattern that for me, has many miles. The Reeta usually ends up as a shirt for me, and I don't usually favour the turn up sleeves, but when balanced with the volume of the culotte legs, they just seemed right. For ease, I stuck with the existing sleeve head (they didn't differ massively anyway) and just used the length and instructions from the Reeta to create the turn up.


And just a few little details... The inseam pockets of the Carmella are quite shallow, so I mashed them together with the B6178 pockets for extra depth - I mean, phones are getting bigger these days, baby pockets are of no use to me. I would have quite liked to use the chest pockets from the Reeta too, but previous experience tells me they are unfortunately just too fussy for my full bust, so I stuck with the originals.


This was quite a fabric-intensive and fairly experimental project, so I picked out a bargain mid-weight poly-mix with a bit of stretch - it has a bit of a crepe feel/drape to it - for £4 a metre from Lucky Fashion in Dewsbury. I used 3m in total.

Unbelted, it's a bit of a baggy romper!

The fabric is weightier than my previous Carmella, so it's turned out a bit heavier and looser than the last version, but it definitely has the 'secret pyjama' value to it. In all, it's more casual than I was intending, but still easy and versatile to wear and I'm really please that all my favourite patterns came together successfully!


Regardless of how fancy it turned out, I made it to wear to a fancy work event I had to go to on day 1 of this year's Me Made May, and of course, I stuck to it - I was even hand hemming the trouser legs on the morning. I wore it with trainers all day and dressed it up with posh shoes and a bag for the evening do.

Dressing it up!
The sleeve heads need an edit next time. The Carmella has a slight drop shoulder, which the weight and little bit of stretch in this fabric emphasised more than I would have liked. I ended up unpicking the sleeves and sewing them with a really deep seam allowance across the sleeve head, but obviously it's better to have things right from the start, so I'll be giving the pattern a little tweak before the next version.


And yes! There will of course be a next time as I'm a firm believer in sticking with things once you've found something you like. I'd really like to wear a similar jumpsuit to a friend's wedding this summer, but I think the fabric needs to be ever so slightly lighter/more luxe for the occasion. I'm on the hunt the perfect fabric now and have until August. If anyone has any suitable suggestions, please let me know!

Stay in touch!

Fibre Mood Wallys Wrap Blouse

When I said I didn't think I could resist this fabric I was obviously weak-willed and entirely right. It's a silk/cotton mix from Fabric Godmother in the very same snakeskin print as the cotton drill I used for my recent Julien Jacket. The opportunity to sew it up into something lovely arose when I was asked if I'd like to preview the patterns from Fibre Mood's latest Pattern Book (number 4, which is available now)! Having had success with their Carmella Jumpsuit and Tara Jumper, I was very much taken by and happy to try the new Wally's wrap blouse.

Wallys wrap blouse - worn not quite as intended
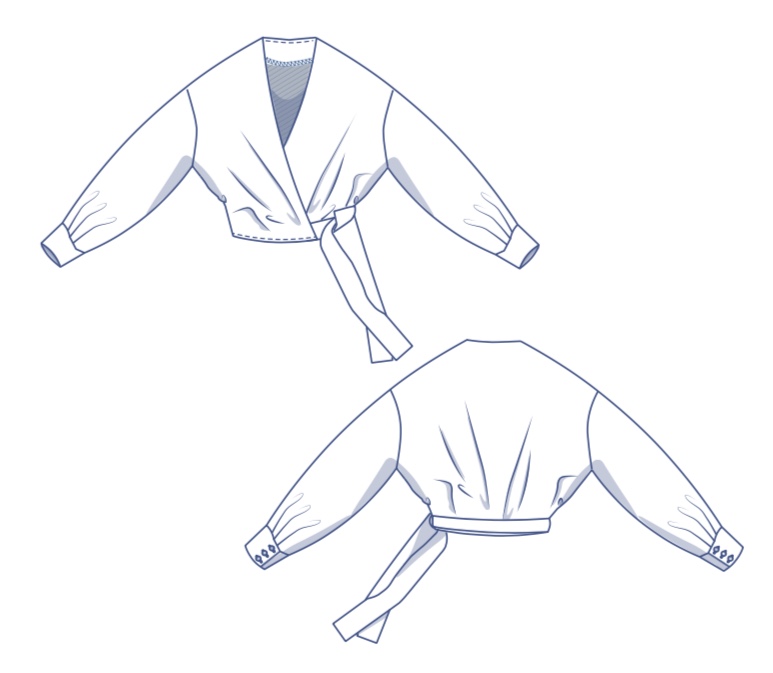
The Wallys is a long and fairly voluminous sleeved wrap around blouse that ties at the smallest point of the waist. I've been wearing my Sayan Blouse quite often, so I thought this would make for a similar, but slightly more relaxed and collarless alternative. What I didn't realise whilst making Wallys is just how versatile it might be to wear. It's worth pointing out that in most of these pictures I've twisted both sides together at the front and looped the ties round the back where they're knotted in a bow - probably my favourite way to wear it. Scroll down for pictures of it worn as intended!

Wallys line drawings
The pattern is available in PDF format, as well as being included in the pattern inserts in the back of the physical magazine - you can also view the instructions for free online before making it by logging into Fibre Mood. I was pleased to see that Fibre Mood layer their PDFs, meaning you can just select and print the size(s) that you want. The only thing that's a bit of a pain is having to add seam allowances, though it didn't take too long overall. I made up a size 40 (UK 12) based on my measurements, but in hindsight, would downsize to a 10 as the wrap style is quite easy-going in terms of fit.


I only bought 1.5m of this fabric as it was quite pricey, and miraculously managed to squeeze all of my pattern pieces out of it - the fabric requirements are given for each individual size: 185cm is the recommended amount for the size 40. I shortened my waist ties by about 25cm to fit them out of the fabric, but they're still plenty long enough!


The make was a breeze and the instructions are easy to follow. I free-styled the ties a little as the pattern wasn't quite clear, but I got in touch with Fibre Mood to check and I've since been informed that it's been updated - I love a responsive and helpful pattern company! Essentially you insert the two ties in between the front blouse and facing on each side.

Back view
Sleeve details and vintage buttons
I always dread cuffs and sleeve slits for no real reason, but these were really straightforward to construct. You'll notice a fair few tucks in the sleeves, which gives them quite a bit more 'puff' than I'm used to. Even though the fabric is soft and light, it holds the shape and volume of the sleeves really well. I never really caught onto the big sleeve trend, but maybe this is the garment that will help me embrace it?

Wrapped as intended!
Whilst it was a lovely make and is a really beautiful blouse on the hanger, there's something I can't quite put my finger on about this look as a whole. I'm wearing the Wallys with my DP Studio Le411 skirt in these pictures, but it's definitely going to take a bit more thought to style it and balance out the volume for day-to-day wear. The sudden burst of warm weather and my aversion to summer dressing might also be coming into play here - maybe I just need a bit of time (and more sun!) to get used to it...  What do you think?

Ways of wearing Wallys
Here are the ways of wearing Wallys that I've explored so far - definitely more options than I bargained for! I'm actually quite into it as a little throw-over summer layer like the middle picture, though I think I might need a summer holiday to make the most of this style! 


If you fancy making your own version of the Wallys blouse, or a whole collection of stylish/on trend garments (the Vienna Dress is on my list!) then I'd recommend picking up a Fibre Mood Pattern Book (you can do a digital browse of them here). I have numbers 1 and 2 and they're great value for money, as well as an aesthetic treat!

See some of the other patterns from the latest edition, made up and shared by makers as a part of Link Party #8

Stay in touch!

Ready to Sew Julien Jacket

It's been a while, but I always love the opportunity to pattern test for Ready to Sew, and the Julien might be one of my favourites yet! The weather is just making a change for the better over here and the Julien Chore Jacket is the perfect spring layer to throw on with just about anything, apart from animal print in my case, as let's just say I went a bit... wild with my fabric choice!

The Ready to Sew Julien
Julien is a simple boxy jacket, inspired by vintage French workwear, with a few neat bits of detailing to keep things interesting, along with French seams and (my favourite) plenty of topstitching! It's not too dissimilar from the RTW styles you might see at Everlane, Toast or even Topshop at the minute. The sizing runs from 32-52 (it's the second Ready to Sew pattern available in an extended size range) and the pattern offers half sizes, along with links to extra tutorials on grading between sizes, lengthening or shortening, enlarging the sleeves and doing an FBA. 

Julien line drawings
My finished Julien!
My measurements set me between a 38 at the hips, 39 at the waist and a 40 at the bust, so not a huge difference on the sizing scale. I always love that Ready to Sew PDFs are layered, allowing you to just print the pattern lines for the size(s) you want to make. This would've made it really easy to grade if I wanted to, but I decided to go with a straight size 39, which has turned out to be a great fit.


There's a whole range of fabrics that would be suitable for Julien - everything from linen for a lighter more shirt-like look, to quite heavy denims for a more durable finish - but I think this might just be my defining moment in fabric selection. I'd planned to go for an on-trend khaki, until I came across this incredible snakeskin print cotton drill from Fabric Godmother and the make turned fully 'on safari'. (It's still available here and I can't tell you how tempted I am by the matching cotton and silk mix too)!
Yes - you may notice that I did change my tights halfway through picture taking!
I used just under 1.6m for the size 39 with a bit of shuffling to the cutting layout (the recommended fabric requirements are 1.85m for sizes 32-44 and 2.4m for sizes 45-52). I bought a 2m length of my fabric so I should have some enough left for some excellent #sewingleftovers - I think it's finally time to make that Fennel Fanny Pack!


The pattern is intermediate level, but I'd definitely recommend it for anyone looking for a challenge too. I found it really easy and enjoyable to make, particularly as it employs a simple approach to the construction of some ordinarily quite challenging elements of a jacket/shirt.

Back view
The back vent is constructed using a clever bit of folding, rather than being made up of multiple pattern pieces. The button placket and sleeve openings are also really simple to construct, and nowhere near as challenging as a regular shirt, yet still have every bit a professional finish, inside and out. The sleeve opening equally saves on pattern pieces, as you just use the seam allowances to create it, and it looks great!

Sleeve/cuff detailing
Pocket detail!
The jacket is unlined, but the inside finish is well considered too, with French seams employed for most edges. A lot of the seams are also topstitched, partly as a design feature, but also for extra durability. The only thing that's a shame about this particular fabric is that it's glowing white on the underside - I wish it was snakeskin print all the way through!

Neat inside and out!


The only thing I changed with mine was to interface the upper collar piece and the cuffs. The instructions don't suggest doing so (the interfacing is just for the button placket), and with a lot of heavier fabrics it's probably not needed, but I thought it would improve the structure of my jacket. Other than that, its spot on and I'd make it exactly the same next time.

Lovely Julien!
I can't recommend the Julien enough, and whilst it might take me a while to get round to it (I've had the Ready to Sew Joe Blazer queued up for about a year!) I'd definitely like to make another, probably in a plain block colour. Thanks to Raph for letting me test yet another fantastic pattern :)

For more inspiration check out #julienreadytosew
The Julien pattern is available now from here


Stay in touch!


Fibre Mood Carmella Jumpsuit

I can be guilty of shying away from intricacies of shirt making, but when I go for it, I definitely don't do things by halves! I combined the opportunity to test some lovely fabric with putting my shirt sewing skills (and more) to the test for my first post as a part of the Minerva Crafts Maker Team!
Finished Fibre Mood Carmella Jumpsuit
You can read all about my experience sewing the Fibre Mood Carmella Jumpsuit over on the Minerva blog now! Check it out here.


Hope you like the finished thing as much as I do! Thanks Minerva Crafts for providing the fabric for this project.

Stay in touch!

Paper Theory Olya Shirt

Has it really been over a month since I last sat at the machine? Life (lots of the good bits and some of the not so good) just got in the way in February, so it was quite a challenge to get back to sewing, and the project I chose was a bit of a challenge in itself! Whilst I probably should've picked a make that would ease me back in, the Paper Theory Olya Shirt contains all the things that excite me about a pattern - precision, top stitching and insanely clever and unusual construction - and it was worth tackling!

Paper Theory Olya Shirt
Tara kindly sent me a PDF copy of the Olya after I posted Insta-musings of what I might make with this amazing fabric. It's rare that I buy a fabric without specific plans in mind, and maybe even rarer that I buy patterned fabric, but I was just so drawn to this very cheap (£2p/m) cotton/viscose/lurex woven mix when I saw it in Liverpool's Abakhan.


At first glance, the pattern could be mistaken for a fairly classic shirt, but inspect the line drawing more closely and you'll see some subtle quirks that make it quite the opposite - mainly the geometric cut of the front yoke and sleeve, and the fact that there's actually no front armhole! It's a crazy design that's quite hard to explain - I had to make it to understand it myself!

Olya Shirt and Shirt Dress line drawings

The construction notes are seriously thorough and quite refreshing in that they actually acknowledge the steps of the project that are challenging. This was a real reassurance when I did come into difficulty during the make, and I must stress that it was through no fault in instructions - this was just one of those projects where everything went wrong for me before it went right! There's also a super comprehensive online sewalong available here, which makes each step really clear.

Finished Olya!
The make throws you straight in at the first step with constructing the sleeve plackets. Despite accidentally sewing things the wrong way round, so my cuff opens the opposite way to what it's meant to, they're probably some of my finest plackets - they're just a little more awkward to fasten when wearing!

Backwards sleeve plackets

A full page of instructions is dedicated to producing the pockets that sit within the the seam joining the front yoke and body. I stupidly overlooked a step and sewed them in a funny way so I couldn't turn my pocket bags through properly. A quick bit of unpicking and a *proper* read of the instructions meant they were easy enough to fix!

Little flash of the very neat inside pocket
Topstitching the pockets down seemed to be more of a design feature so I opted not to as my fabric was already a bit fussy, but in hindsight, I think it would have been beneficial in holding everything neatly in place. I'm quite full busted so in this fairly fluid fabric, the pockets were destined to gape open over my boobs - not quite the 'eye-catching' look I intended! - so I've tacked them closed for now. I'm pretty confident they'll work out better in a plain and heavier fabric next time, with the addition of the topstitching and button closures.

Back view
Back
The sleeve/yoke construction is really exciting to make. The pattern offers a full page of in-depth instructions on just creating the square corner that joins the front yoke/sleeve to the back body - something I was very grateful for because this is really some never-seen-before sewing stuff! The finished join creates a really cool silhouette and cleverly shapes the front - which I found to be quite accommodating for my bust.

Geometric seaming joining the back/arm/front yoke
Size wise, I sat in the middle of a 10 and a 12 for the bust and waist (smaller at the hips) but I opted for the size 10 based on the finished measurements and knowing that the style is a bit oversized. I like the fit of the 10 but think I think it would be equally great being slightly more oversized too.


I only spotted one thing to really watch out for... The shirt requires 11 buttons rather than the suggested 9 if you intend to use matching buttons for the pocket closures too! Luckily I didn't this time, but definitely something to be aware of for next!


It took a bit of effort to style the Olya in a way I felt comfortable with, and I now realise it's because I don't really have many (any?) proper shirts in my wardrobe - am I unconsciously identifying gaps now?! I think it has a real 70s vibe to it in these pictures (worn with Lander Pants), which I'm totally into, though I'm still undecided as to how I like it best, worn open as an extra layer, or buttoned closed... what do you think?


No way am I finished with this pattern just yet, especially now I've spotted a wardrobe gap to fill. I have a plain grey flannel lined up for version two, which I can definitely see becoming a layering staple - and a bit more in keeping with some of that Berlin style inspo I was gushing over last month. A block colour will be perfect for really showing off the cool style lines too. This time, let's see if I can get everything right...

Stay in touch!


Thanks for visiting!

Thanks for visiting!