TPC16 - Trend Patterns Side Drawstring Dress

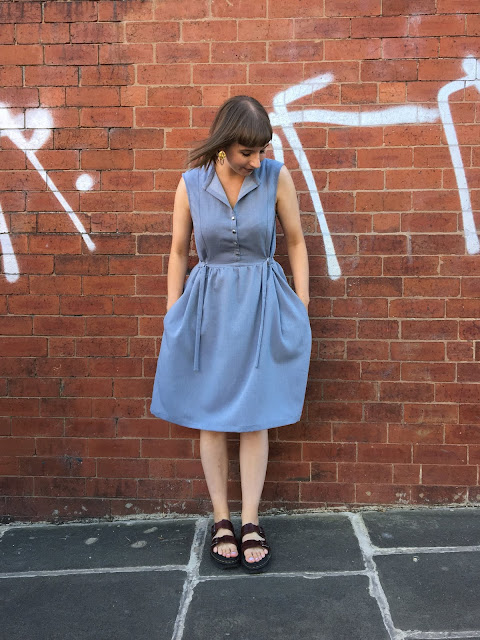
Sewing can evoke a lot of emotions including, on the rare occasion, frustration, anger and disappointment. I felt all of these things whilst making the Trend Patterns TPC16 Side Drawstring Dress and was so close to giving up so many times. Fortunately, I haven't got room for UFOs in my life or flat and channelled some serious Tim Gunn 'MAKE.IT.WORK' vibes to get to the finished thing. I chopped and changed it so many times that I'm not sure how far removed it is from the intended fit, but... I think I kind of like it!

Trend Patterns TPC16
Styled with boots, bag and jacket
I really like Trends' aesthetic and they go some way to filling a huge gap in the sewing market for patterns that are edgy, fashion-forward and most importantly, actually wearable. Ironically, it's that fashion-forwardness that actually delayed me from sewing up this pattern, which has been in my stash since it was released. Whilst Trend's samples and lookbooks are pretty awe inspiring, I couldn't imagine how this dress would look in anything other than that shiny silver foil - I haven't seen any other makers try this one, so maybe I'm not alone in thinking this?

Side tie detail
It was a throwaway comment from my boyfriend about making more 'edgy' clothes that finally prompted me to go on a more purposeful hunt for suitable fabric. The pattern requirements state 3m of fabric 'with a good bias' or jersey, like one of the versions on their website, which was made without fastenings. I'm always a bit hesitant as to how one pattern can successfully translate to such totally different fabrics, so I went with a woven textured gingham check from Abakhan.
Cutting layout for the HUGE pieces
I still wasn't 100% sure it was 'the one', but it was the best I could find, and at only £4.75p/m it was pretty affordable. Trend only state fabric requirements for the upper size in their range, so I bought 2.5m, which just accommodated cutting the size 12. Be warned that the PDF is a massive 68 pages. Sticking it together and cutting it out took a full day and my whole floor space, twice over.

The pattern instructions forewarn makers that the dress follows an 'odd order' of construction in comparison to a usual dress, but for the most part, I found them fine to follow. Having made the Frilled Hem Top, I knew the patterns assumed a little bit of prior knowledge, but the photographs to support the written instructions are pretty helpful. I only got really confused with the instructions for 'bagging out'/attaching the facing to the armholes and ended up in a bit of a death loop twist before unpicking and starting again.


The difficult thing about the 'odd order' of construction is that you can't try the dress on to gauge the fit until really near the end of the make (you close the side of the dress with the drawstring channel at the very end). When it came to sewing the drawstring channel in place, I knew the dress would be HUGE. Weirdly the shoulders don't sit symmetrically, and the drafting of the armhole on the drawstring side doesn't take into account that the channel adds a good couple of inches to the width of the dress. This meant it was not only really big on one side, but had a huge gaping armhole too.

Finished drawstring channel
Thinking that the project was going to be a huge fail inspired the following and fairly reckless series of adjustments - I'd invested too much time in it by this point for it to never be worn! I unpicked the drawstring channel and took about 4" out of that side of the dress. When I tried the dress on again, it was still way too big, but I could see the potential in it. I wish I'd have took pictures to show the before adjustments vs after, but when you're really in the zone of wanting the project to work, it can totally plummet your mood when things don't go to plan - bad-fit selfies were the last thing on my mind!


I don't want to be unfair to the drafting of the pattern if it was intended to be loose fitting, but I would have at least expected the neckline, shoulders and armholes to fit and sit nicely. Either way, it just wasn't working for me - I looked like I was wearing a gathered up duvet cover - so I unpicked the back neck/facing and took the back darts much wider and deeper to get the dress to lay flat. Not ideal, but I also had to make darts in the facing to get the pieces to match back up again. 
Back view, which for once I actually love!
After this, I took a couple of cm out of each armhole. I sewed and re-sewed the zip in 3 separate times, on each go taking a bit more fabric out. I took around 3" out of the zip side-seam in total, with an extra chunk out of the underarm to reduce some armhole gape/get a closer fit at the bust. The fit still isn't 'perfect' and I definitely took some of my adjustments a little too far - I could've done with leaving a bit more width through the hip/middle - but I'm really pleased that I was somehow determined enough to rescue it from near-disaster.


Despite all the stress of the make, I feel lots of positive things about the finished dress - proud that I managed it, impressed by the skill I put into making it, excited to wear it! I love the finished thing and it does feel sort of 'edgy', particularly when worn with my Ida Clutch, boots and leather jacket as seen in some of these pictures. The drawstring is an amazing feature - I used cord rather than creating my own ties - and it totally transforms it from something that looks just plain weird on the hanger to a cool and unusual garment to wear. I never really say or think this about my makes either, but it even looks great from behind.

A bit of a saga getting there, but a finally well fitting TPC16
I can't say that I'll be in a hurry to sew the Side Drawstring Dress again, but it does make for a nice addition to the wardrobe, and it will definitely transition well into autumn. I wouldn't not recommend this pattern, but all I can say is be prepared to make adjustments, or if you can bear the thought of doing all that cutting twice (I can't!) then without a doubt, make a muslin!


Stay in touch!


Cocowawa Honeycomb Dress

The lovely Ana of Cocowawa Crafts kindly asked me if I'd like to join in with the Honeycomb Blog Tour wayyyy back in February (incredible planning skills Ana!) before the Honeycomb was even released into the world! I'd never sewn a Cocowawa pattern before, so thought it would be a good opportunity to try out a new-to-me indie pattern company. I also really liked Ana's idea of spreading out the Blog Tour to show the potential of the Honeycomb right through until the Autumn/Winter as it's a really versatile pattern. Here's my own summer version of the Honeycomb Dress!

Cocowawa Honeycomb Dress
I have to be up front and say that the Honeycomb is much cuter and more feminine in style than I'd usually go for. I spent a long time hunting for a suitable fabric to 'toughen' it up. I was hoping for a cool, minimal graphic print, but they're always so difficult to come across. I'm getting close to attempting to print/paint my own (very much inspired by the recent efforts of @dfabricater), but I'd honestly rather just buy it ready made! If anyone has recommendations for sourcing some graphic goodness, please let me know!

Hardware hack!
After accepting minor defeat on the fabric front, I plumped for some stash busting with this plain but nice quality drapey cotton-mix that has the look of lightweight denim. I thought the solid colour would really show off the silhouette of the dress and I exchanged the bows for a little hardware hack to make it a even more minimal. I cut the long ties at twice the original width to fit my 1" D rings, and made short tabs to attach the hardware between the side seams.

Obviously a winner -it has pockets!
I sewed up a size 3, extending the bodice by 1" using the lengthen/shorten lines as I thought it might come up a bit short on me. In hindsight this really wasn't necessary and I would make it as-is in future! I would NEVER normally make a princess seamed garment as I like to avoid tricky fitting in the bust area, but I'm really impressed with the fit! The ties at the waist give you the option to bring the waist fit really close, whilst still allowing for a generous fit in the bust (I'm an FF cup with a really narrow back for reference)!

A bit too much excess in the back!
The lower back has a lot of excess and sits too low for me - mostly my fault for adding too much length, but also not helped by my bust lifting the bodice higher than it should sit in the front. For future versions I'll try on the bodice before attaching the skirt and level out the fit there. I found the neckline just a little too high too, so I tacked the collar out into this open position. I'm quite pleased with it like this and would probably do the same next time.


I sewed my Honeycomb Dress with short sleeves, but it wasn't until I tried it on that I realised they didn't quite work in my fabric choice - it felt a little 'matronly' (for some real short-sleeved Honeycomb inspo you can't go wrong with Marie's fantastic version)! Instead, I cut them off, using the remaining sleeve edge to bind my armholes. I took a big chunk out of the side/under arms - the instructions guide you through this - to get much closer fit in the bodice for the sleeveless version, but my armholes have ended up a little clunky due to the last minute sleeve chop. I'd definitely take more care over the armhole finish next time!
Unfortunately not feeling those sleeves!
The instructions are totally flawless and beautifully designed. Ana's illustrations and steps are really detailed and easy to follow, whichever version you opt for. My personal favourite part of the make was doing my very first burrito method to sew the yoke/bodice/yoke lining together - a fun technique and one I'll definitely try again!

A little bit clunky, but a successful last minute sleeve chop
In all, I'd say that my Honeycomb doesn't quite do justice to such a nice pattern, but my first version will definitely go on to inform the fit and fabric choice of future versions. I'll be sticking with the D rings as I totally love them, but it still needs a bit more toughening up to feel more 'me'. Regardless of this though, the Honeycomb has made for a pretty cool sundress (fingers crossed the weather stays good!) as well as being work appropriate, which is a bonus!


Without really realising it, I've become a go-to trouser person, so it's been really nice to break away from that and try something different, both in making and wearing. I'm inspired by all the fab versions on Instagram to keep working towards my perfect Honeycomb, and I'm confident I'll get there, I just need to work out how to make it 100% 'right' for me - fabric and styling suggestions welcome!
Sun dress in the sun! 
Thanks Ana for encouraging me to sew up only my second dress of 2018 and giving me the opportunity to be involved in the Blog Tour. The Honeycomb is such a sweet pattern and I'd definitely recommend it for all levels of maker - plus there's a great sew along online if you need a helping hand!

Keep your eyes peeled for more versions coming in the Blog Tour - Autumn dressing is my fave, so maybe that's where my dream Honeycomb will be realised!


Stay in touch!


Simplicity 8608 Jumpsuit

I'm really leaning towards Big 4 patterns lately. I've been practicing seeing beyond the picture on the pattern envelope, as lets be honest, the Big 4 releases don't always hit the mark on first look. But the Simplicity 8608 stood out as the picture is... surprisingly nice - and there are a whole bunch of versions on Instagram that suggest other makers feel exactly the same!

Simplicity 8608 view D in contrast fabrics
As an all-in-one lover, it was always going to be View D for me; a wide-legged, faux wrap jumpsuit with short flounce sleeves, but I'm actually pretty fond of all the views. In the absence of the neckline frill (which I was worried might be a little too fussy for me), I opted for the ultimate, all-out contrast fabric pairing. Working out the contrast cutting and making sure each piece was cut with the right right side/wrong side totally hurt my brain. Cutting out in 2 different fabrics also took twice as long, but I think the end product was well worth the extra planning and effort. Other than making it more difficult for myself though, the pattern prep is generally very straightforward!

Planning the polka contrast!
And checking I got it right!
Despite my measurements aligning more closely with a size 14, I cut a 12 as the pattern has a lot of ease. What I didn't perhaps take into account was that some of the bodice ease was built in to allow for taking it on and off (the pattern isn't meant to require any fastenings), but to be blunt, it is completely unrealistic to make this pattern without a zip - Simplicity what were you thinking?!


I was forewarned by a kind Instagrammer that a zip might be necessary, and after sharing my finished jumpsuit, other people have said exactly the same - only a contortionist could make their way in and out of this garment without one! Luckily, in using the contrast fabrics, I'd already split the back piece rather than cutting on the fold, so when I ambitiously attempted to make it as directed - it wouldn't even go down past my shoulders - it was just a case of unpicking the centre back seam. 

Carrying the contrast through to the back!
I could have gotten away with a zip on just the upper half of the bodice, but instead inserted a concealed zip that runs the full length of the back (22") to avoid any additional stress on the elasticated waist when taking it on and off. Other than that quite big hiccup, the instructions were really easy to follow - is it just me or are Big 4 instructions getting better?! - and the whole construction only took a day. 

Party in the back!
The bodice faux-wraps across the front, and you sew a channel in the waist seam allowance to thread a skinny bit of elastic through for a closer fit. I guess the tie belt could be optional, but I prefer mine worn with it as it pulls together all of the contrasting pieces. The neckline sits a little wide for me, so I would probably adjust the shoulders if I make this pattern again - securing the pieces together at the bust did help a little, but I broke the stitches on the first wear! The overall fit is perfect for me, but it's worth noting that there isn't a great deal of depth in the body - I'm 5ft 6", but taller ladies may want to consider lengthening it. 


The circle sleeves are more feminine than I'd normally go, but I really like the movement and hang of them. The black crepe is slightly heavier and has more bounce than the polka fabric and annoyingly, the hem curls to the right side, but this jumpsuit was made for moving/dancing so hopefully no one will notice! Another 'oops' moment with the sleeves was being too lazy to change my overlocker threads from cream. The inside seams of the sleeves become visible with movement so I had to emergency colour the overlocker stitching in with black sharpie!


I honestly think this is one of the best things I've made in ages - maybe ever? - but then I say that about nearly all of my latest makes. It definitely brings back fond memories and fills the gap left by this old favourite polka jumpsuit which no longer fits! I'm particularly proud of how well the contrast fabrics turned out, and I feel very much encouraged to experiment further with this in future makes (a potential for  #sewingleftovers)!

At Jodrell Bank to see my favourite guy play at Bluedot festival
It might not look like practical festival attire, but it had it's first turn in the field at Bluedot the other weekend and was greeted with some lovely compliments. I know I'm not the most practical dresser, but in my defence, the jumpsuit is much easier to get on and off with the zip and more importantly, it has pockets! I also wore it with heels to a recent work event, so I can definitely seeing it getting wear on all occasions!


I really love how this pattern turned out and I can definitely see myself making a lengthened version of View A if I can find the right fabric - a solid colour or a minimal graphic print maybe? I'd definitely recommend the Simplicity 8608 to makers of pretty much all abilities as it's such a great and versatile pattern, but PLEASE remember to include a zip!

Stay in touch!


Thanks for visiting!

Thanks for visiting!