DP Studio Le 809 Coat

The latest DP Studio collection has filled me with inspiration and a determination to make. I'm hugely proud of making my clothes by hand, but I don't want them to be immediately identifiable as handmade (I'm sure a lot of fellow sewists feel the same)! I think it's the extra design details - like the hardware in my last project - that really help to retain that air of 'handmade or high end?' mystery, and DP patterns have their pick of design features. Out of the two patterns that I ordered, I got straight to work on the most seasonally appropriate: the Le 809 Coat.

Finished Le 809
The Le 809 is an oversized, partially lined coat, with two length options (both are pretty long), welt pockets and, the selling point for me, the option of having an 'incorporated gilet' with View A. It helped that I already had the perfect fabric in my stash - a soft, grey leopard print wool (mix I think?) bought at the Harrogate Knit and Stitch Show in 2016. I had been considering using it for the Orgageuse Riga Coat but I knew that the DP Studio Coat would work perfectly with the print as soon as I saw it. The fabric requirements for the Le 809 were confusingly listed as 3.15m on the cover and 3.25m in the instructions, but either way, I managed to squeeze it out of the 3m of fabric I had.

Supplies for the Le 809 (with button options)!
I thoroughly enjoyed all aspects of this project, but I must admit, I did have a few frustrations with the instructions, the first being the poor listing of required notions. The zip length isn't specified so I had to measure the pattern pieces to work it out - I made the size 42 and found a 40cm zip to be just right. I also used nearly 5m of fusible bias tape - not mentioned until the instruction to apply it - and I was most shocked of all that the requirement for nearly 10m(!!) of bias binding was nowhere to be seen. I've never done so many trips back and forth to town for one project. I think I rinsed the haberdasheries of Leeds of all their black and grey bias binding, so FYI, buy in bulk!

Worn open with a zipped gilet

A note on the instructions... If you've used a DP Studio pattern before, you'll know that they favour large and quite simple illustrations, usually with fairly short descriptions of how to complete each step. I got on with this format really well for their Knit Asymmetric Dress which is quite an easy make, but I was surprised to find that more detail wasn't included in the instructions for a project as complex as a coat. Perhaps some of the struggle came from trying to understand the translated instructions which don't always read too clearly, but I also found myself having to do a lot of thinking beyond the pattern.

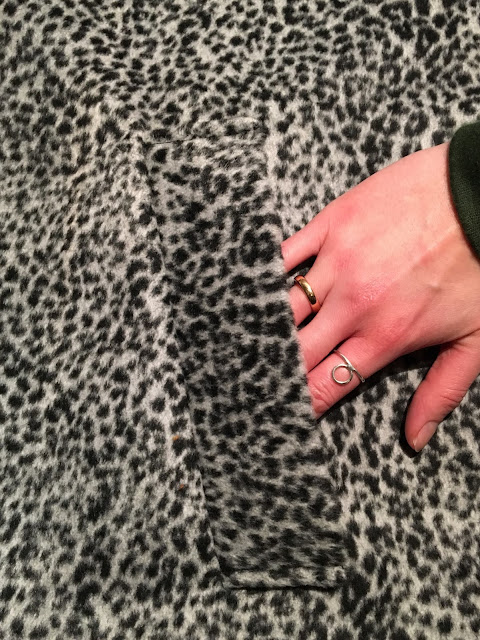
Camouflage welts!
The welt pockets are the first things to sew and to be honest, the instructions were baffling. The pattern doesn't indicate where the cutline for the pocket should be, so I attached my welt/facing pieces to the wrong side of the rectangular marking, meaning my pockets sit higher and closer to the side seams than intended. They look fine from the outside so it's no big deal, but the inside is a bit of a mess, which is a shame as the coat isn't fully lined, so they're exposed.


Apart from the more time consuming elements like the pockets, the coat came together really quickly. Nearly all of the seams are finished with bias binding (hence the huge amount required) which looks pretty neat, though I would recommend getting a couple of different widths to accommodate the bulkier seams/edges. The collar and facings were all pretty straightforward to attach, but I did stumble with finishing the vent and hem.

Total confusion over the length/hemming
The hem lines were really confusing, so it might be that I did something wrong at the cutting stage, but the pattern seems to direct you to cut out a square at the bottom of the centre front. It quickly became clear that the rest of the front was much longer than the front facing and back pieces when they were all joined together (see picture above). Even more bizarrely, when I compared pattern pieces with fellow maker Jess, hers seemed to have different cut/hem lines!

Back view and wind-blown vent
The slit facing for the vent was also too long, so I cut off the excess on that and the lower front, before winging the rest. I attached the hem to the front facing loosely based on how I remembered doing it on previous jackets (I shortened the front facing by a couple of inches and sewed it to the right side of the bottom front, so that some of the front flips to the underside with the facing) and stitched the rest of the hem by hand.

Pre-gilet insertion
Thankfully the gilet was really fun to construct and quite easy to attach to the rest of the coat. It's essentially a backless zip-turtleneck, made up of 2 layers of the outer fabric (one of them is interfaced) so it's really warm to wear. The collar is a little restrictive when fully zipped up - especially with a wardrobe-staple roll neck underneath - so I would probably shave 1cm off the depth if I made it again.


Strangely, the coat is only half lined - a design choice I guess, but after all of the effort with binding the edges (as neat as they look) it may as well be fully lined, and I wish it had been an option. If I made the coat again, I'd consider extending my lining pieces, as my intention was to fully make a statement with my contrast lining (not just a half of one)!

Half lining and insides
After all of the work that went into the coat, I couldn't spoil it with normal buttonholes, so I made my first ever bound buttonholes following a tutorial from Colette. I had to finish them by hand due to the bulk and weight of the coat, but I''m really pleased with them. I wish I'd budged each one up by an inch - you know once you notice something is a bit off and can't stop thinking about it?! - but I can live with them as they are! I bought 3 different sets of buttons to pick from, and eventually went with these cool silver mirrored ones from Duttons for Buttons.

Buttons from Duttons for Buttons
I finished up the coat with a lot of hand stitching to secure the different layers of facing/collar/outer together. I'm not sure if this is standard practice for more experienced coat sewists, but the coat does look better to wear for it and is easier to put on without loads of straightening and adjusting. It still sits a little off sometimes (you can probably notice the gilet is a bit bunched up in some pics) but I did the very best I could with it.

Layers of collar and gilet
I feel like I've complained about the pattern quite a bit in this post, but I have to stress that I'm absolutely thrilled with my finished coat! DP Studio is in a league of its own in terms of offering such impressive, fashion-forward designs, and although the instructions were a bit sparse in parts, they encouraged me to slow down and flex the skills I already have. Focusing on the step in hand rather than the end goal really did make the process of sewing the coat much more enjoyable. I surprised myself with what I was able to work out and whilst I might not have followed each step exactly as intended, the end result looks exactly as it's meant to, which is pretty satisfying.

Check the oversized style
It's definitely a statement coat, both in silhouette and print, and I'm really happy about it - it feels unusual and very 'cool' to wear! I think I benefitted from having made a few bits of outerwear in the past and would've probably been in tears if not, so I wouldn't recommend the Le 809 for a first attempt at coat making. It is a great make though, and a good challenge if you're willing to put a bit of thought into the construction. I'm sure there are also plenty of sewing tutorials out there to help with some of the trickier bits - the welt pockets, finishing the vent and the front facing/hem.

Thanks Erin for taking super profesh pics :)
As someone who always had expensive taste in RTW coats, it's such a pleasure to be able to make my own. I loosely costed this make up and the materials came in at around £60. I couldn't imagine finding a coat with such an interesting and unusual design for anywhere near that price on the high street. Successes like this only serve to remind me why I sew rather than shop!

I'd be interested to hear about other people's experiences with DP Studio patterns. Their Le 915 shirt dress is next on my list - lets hope the instructions are easy to decipher!

Stay in touch!


Simplicity 8459 Skirt (plus pattern giveaway!)

Probably my wisest decision of 2017 was to take the first week of 2018 off work, so I've been busying myself with my freshly laid out sewing plans. I didn't achieved masses, but I've definitely warmed up in advance of some major-commitment coat making (more on that soon)! I made a Papercut Patterns Kyoto Sweater - a fine palate cleansing project - and have just finished the slightly more satisfying Simplicity 8459 skirt.

Finished Simplicity 8459
The pattern is a fairly new-release from Simplicity and unlike the majority of 'Big 4' patterns, I was drawn to it because the cover version is actually, you know...nice! I also LOVE a project with hardware - it makes a simple make feel just that bit meatier and I secretly quite like the extra surprise from non-sewists when they found out you made it (but how you could've possibly made something with a buckle/rivet/D ring etc??).

Skirt making kit
I did an order from Minerva for all the hardware. After my button hardware troubles with the Lander Pants, I'm steering clear of cheap brands for a while so I went for Prym eyelets, which come with attachments to insert them that fit the pliers I have - they also include tools for if you don't have pliers too! Options were more limited for the buckle which needs to be 2" wide to fit the front wrap piece - you could probably adjust the pattern if necessary - but I'm pleased with the oval shaped one I managed to get to match the eyelets.

Tools for hardware insertion
Frustratingly for me who hovers around the 12-14 mark, the pattern size range runs from 4-12 and 14-22, so I actually ended up buying both due to fluctuating measurements (see further down the post if you'd like my extra copy)! I made a size 12 using rust orange corduroy from Fabrics for Sale. I had ordered enough fabric for the longer version, but decided that View B would fit in my wardrobe better based on how much wear my New Look 6418 mini skirts have had. The front wrap panel is lined in a perfect-match orange viscose that I happened to have in my stash and I think I'm going to use the remaining cord to make a matchy slouchy bag.


Although there is no provision for lengthening or shortening view B, I added an extra 1" to the length of my pieces when cutting as I was worried it might turn out obscenely short. And yes it is short - I'm a fairly average 5ft 6" for reference, but adding that extra inch feels very necessary.

Buckle and eyelet detail

The instructions are surprisingly thorough and there's also extra advice offered for making the skirt up in leather/faux leather/suede which is really handy. Although I like it in the corduroy, the fabric doesn't take to the rivets and buckle quite as well as I'd like, so I would be tempted to give it a go in a more substantial pleather - I wore this faux leather Nita Wrap Skirt LOADS, so there's a definite pleather-gap in my wardrobe.

Back view
Whilst there's a part of me that feels a little underwhelmed by it on a whole (I think I'm just itching to get stuck back into some more serious and lengthy projects now) it is a really sweet, easy-to-wear basic. In all, it was a quick skirt to make that requires very little fabric. I might start hunting for 2" buckles now as I can see myself making it again in future.


*Giveaway* (Now closed)!

I have an extra copy of the Simplicity 8459 pattern in the 14-22 size range (pattern measurements here) to give away! 

Please let me know in the comments below if you'd like it along with your email address and I'll pick someone at random to receive it on Friday 19th January :)


Stay in touch!

2017 in sewing V 2018 in sewing plans

Happy New Year all! 2017 has been a good and varied one in terms of sewing, so before I launch into my sewing plans for 2018 (I have many!) here are some of my favourite makes of the year:

L-R: Sahara Shirt, Jazz Jumpsuit, Isla Trench
Ralph Pink Sahara Shirt - my first make of 2017 and my hands down best high street rip off of all time.
Ready to Sew Jazz Jumpsuit - my most worn item of the summer was my tester version of Jazz. The pattern and fabric paired so perfectly and I quickly followed it up with a classic black crepe version.
Named Clothing Isla Trench Coat - it goes without saying, this is by far the biggest sew I've ever attempted, with more techniques and pattern pieces than I care to recall, but such a satisfying end result. I've worn it everyday since finishing it!

Pattern testing L-R: Joanne Culottes, Jazz Jumpsuit, Fern Shorts, Linda Wrap Dress
I was also lucky enough to be invited to pattern test for wonderful designers such as Ready to Sew, Afternoon and Just Patterns this year, and I found myself having to turn down even more opportunities to concentrate on some of my own projects that I really wanted to commit to. Hopefully there's more pattern testing to come in 2018 (as long as I have time to fulfil some of my own sewing plans too... read on for those)!

I was a bit half-hearted with my 2017 make nine plans, managing 5 out of 9 in the end. I'm usually quite good at sticking to my sewing plans, but to be honest, I treated the challenge more as a nice picture to pin on the wall rather than a solid plan I was enthusiastic about running with.

My 2017 make nine, 5 out of 9 managed with one project rolled over to 2018
The things I did manage:
1. The M7429 dress, cutting it fine as my last make of 2017
2. A knitted Wool and the Gang clutch, which to be honest, is pretty disappointing. It looks odd and twisted once sewn up.
3. A denim trench, more specifically the Named Isla Trench Coat. By far my make of the year, if not my best/favourite make ever.
4. A denim wrap skirt/jumper combo in the form of this Nita Wrap Skirt and Talvikki. I really don't like this version of the Talvikki and the skirt is unfortunately now too big, but got quite a bit of wear earlier in the year.
5. I swapped a McCall's wrap blouse out for the Ready to Sew Jane Shirt. As above, I could probably do with downsizing now, but I'm very much a fan of the pattern.

On a personal level, the latter half of the year was disrupted by unexpected weight loss, some dietary/health issues, which I'm happy to report are now under control (gluten and dairy I miss you, but it's just not meant to be), and consequently, fluctuating measurements! This has really impacted upon my sewing and I've been having difficulty adjusting to my new measurements, which have just about settled. It's made some clothes too big, including the trousers that I'd just managed to perfect and my beloved collection of B6178 culottes :( A lot luckily are still fine, like my oversized makes and many Fall Turtlenecks, and it's improved the fit of just one garment - my DP Studio Knit Asymmetric Dress.

A 2018 make nine I can stick to!
So my first sewing act of 2018 will be to address the gaps in my wardrobe with a whole bunch of exciting new clothes that fit! I wasn't going to do a 2018 make nine, but when I evaluated my 'to make' list and stash, I realised I had 9 projects queued up that I am SO EXCITED to make! They are:

- Papercut Patterns Kyoto Sweater in green sweatshirting
- Simplicity 8459 in orange corduroy
- A third attempt at the Lander Pants, probably in blue denim
- Named Nascha Mini Skirt in mustard textured denim
- DP Studio le 809 Coat with gilet, in grey leopard print wool
- République du Chiffon Elisabeth Blouse in khaki crepe
- DP Studio le 915 Shirt Dress in bottle green viscose
- Wool and the Gang Relax Knit Through It Sweater in orange Feeling Good Yarn
- Trend Patterns Side Drawstring Dress, fabric TBD

I'm also feeling inspired by the attempts of the Love to Sew ladies, so once I've cracked on with some of these makes, I'm planning on doing my own sewist 10x10 challenge - picking 10 wardrobe items (including shoes!) and mixing and matching them to make unique outfits for 10 days! I wonder if anyone else would like to join me?

Thank you if you read this far! Wishing you all a wonderful year of sewing and looking forward to seeing everyone else's makes in 2018.

Shauni
xx


Stay in touch!

Thanks for visiting!

Thanks for visiting!