Simplicity 8608 Hack in Bubble Satin Crepe

It's been a while... and part of the reason why is that I honestly needed a break after spending what felt like half a lifetime sewing (and hand hemming) this Simplicity 8608 hack. Luckily I think the finished thing is sort of beautiful and it's up on the Minerva blog now!

Now to find an appropriate occasion to wear such a luxe dress and... take a step back onto the everyday sewing wagon! I have plenty of plans lined up for my favourite sewing season - Autumn!


Thanks to Minerva for providing the fabric for this project. See the full review over on their blog now.

Stay in touch!


Simplicity 8459 Skirt (plus pattern giveaway!)

Probably my wisest decision of 2017 was to take the first week of 2018 off work, so I've been busying myself with my freshly laid out sewing plans. I didn't achieved masses, but I've definitely warmed up in advance of some major-commitment coat making (more on that soon)! I made a Papercut Patterns Kyoto Sweater - a fine palate cleansing project - and have just finished the slightly more satisfying Simplicity 8459 skirt.

Finished Simplicity 8459
The pattern is a fairly new-release from Simplicity and unlike the majority of 'Big 4' patterns, I was drawn to it because the cover version is actually, you know...nice! I also LOVE a project with hardware - it makes a simple make feel just that bit meatier and I secretly quite like the extra surprise from non-sewists when they found out you made it (but how you could've possibly made something with a buckle/rivet/D ring etc??).

Skirt making kit
I did an order from Minerva for all the hardware. After my button hardware troubles with the Lander Pants, I'm steering clear of cheap brands for a while so I went for Prym eyelets, which come with attachments to insert them that fit the pliers I have - they also include tools for if you don't have pliers too! Options were more limited for the buckle which needs to be 2" wide to fit the front wrap piece - you could probably adjust the pattern if necessary - but I'm pleased with the oval shaped one I managed to get to match the eyelets.

Tools for hardware insertion
Frustratingly for me who hovers around the 12-14 mark, the pattern size range runs from 4-12 and 14-22, so I actually ended up buying both due to fluctuating measurements (see further down the post if you'd like my extra copy)! I made a size 12 using rust orange corduroy from Fabrics for Sale. I had ordered enough fabric for the longer version, but decided that View B would fit in my wardrobe better based on how much wear my New Look 6418 mini skirts have had. The front wrap panel is lined in a perfect-match orange viscose that I happened to have in my stash and I think I'm going to use the remaining cord to make a matchy slouchy bag.


Although there is no provision for lengthening or shortening view B, I added an extra 1" to the length of my pieces when cutting as I was worried it might turn out obscenely short. And yes it is short - I'm a fairly average 5ft 6" for reference, but adding that extra inch feels very necessary.

Buckle and eyelet detail

The instructions are surprisingly thorough and there's also extra advice offered for making the skirt up in leather/faux leather/suede which is really handy. Although I like it in the corduroy, the fabric doesn't take to the rivets and buckle quite as well as I'd like, so I would be tempted to give it a go in a more substantial pleather - I wore this faux leather Nita Wrap Skirt LOADS, so there's a definite pleather-gap in my wardrobe.

Back view
Whilst there's a part of me that feels a little underwhelmed by it on a whole (I think I'm just itching to get stuck back into some more serious and lengthy projects now) it is a really sweet, easy-to-wear basic. In all, it was a quick skirt to make that requires very little fabric. I might start hunting for 2" buckles now as I can see myself making it again in future.


*Giveaway* (Now closed)!

I have an extra copy of the Simplicity 8459 pattern in the 14-22 size range (pattern measurements here) to give away! 

Please let me know in the comments below if you'd like it along with your email address and I'll pick someone at random to receive it on Friday 19th January :)


Stay in touch!

May, Me Made May and May Martin

Here's to a fabulous sewing filled and themed May! I completed my first full Me Made May, wearing at least one (if not more) me made garments per day, and I have to say, it's a really great feeling! I also went to the wonderful Big Simplicity Blog Meet in Manchester, and my sewing productivity is through the roof - I made 3 basic tops, a pair of culottes and some dungarees all in May! First, here's my round up of the second half of MMMay16, featuring slightly more colour than the first half:

Week 3

Top row: days 15, 16 & 17; Bottom row: days 18, 19 & 20
Day 15 - Self drafted Liberty dress; Day 16 - Vogue 1395; Day 17 - Blue Kielo Wrap Dress; Day 18 - Faux wrap skirt; Day 19 - Nita Wrap Skirt and sleeveless rise turtleneck hack; Day 20 - Simplicity 2154 skirt; Day 21 - (pictured below at The Big Simplicity Blog Meet) B6178 culottes, sleeveless Rise Turtleneck and Driftless Cardigan.

Week 4


Top row: days 23, 24 & 25; Bottom row; days 26 (day and evening), 28 & 29
Day 22 - (not pictured) same as day 21; Day 23 - floral self drafted skirt and sleeveless Rise Turtleneck; Day 24 - Floral Kielo Wrap Dress; Day 25 - Rise Turtleneck and GBSB hacked skirt; Day 26 - Lottie Blouse in the day and faux leather Nita Wrap Skirt in the evening; Day 27 - (not pictured) polka dot Nita Wrap Skirt; Day 28 - Turia dungaree dress; Day 29 - Turia dungaree dress and sleeveless rise turtleneck

Days 30 and 31 came from my holiday in Barcelona, and featured my recently blogged B6178 culottes, the wrap top I made as a part of my 'make more tops pledge', and my yet-to-be-blogged second pair of Turia dungarees - those of you who follow me on Instagram may have seen them over there!

Final thoughts on this year's Me Made May...

- My style's definitely evolved. I can split my me made wardrobe into Before-Kielo Wrap Dress and After-Kielo Wrap Dress. Making my first Kielo last year really marked a shift in my me made style, and it's the After's that definitely get a lot more wear.

- I'm moving house soon and have to do the brutal wardrobe cull, so Me Made May has really helped with some difficult decisions. My V1395 dress (pictured on day 16 above) is getting recycled - I just don't get on with the fit -  along with a bunch of older makes that never got a look in during the May.

- You know those days where you just don't feel like getting dressed? Well I haven't got any comfy me mades to wear on them. I'm not sure if this will spur me on in making a bunch of 'house clothes' but I'll definitely consider getting some PJ bottoms sewn up.

- I'm finding that wearing more than one me-made per day is coming quite naturally - maybe I'll have to up the challenge level of my pledge next year (!!!)

- I LOVED seeing everyone else's makes. My Instagram feed was so vibrant and positive all month - so much talent and beautiful patterns and fabric that I'm now dying to try out. It wouldn't be the same if MMMay ran all year round, but there's a part of me that wishes it would - thanks Zoe for organising once again.


The Big Simplicity Blog Meet!

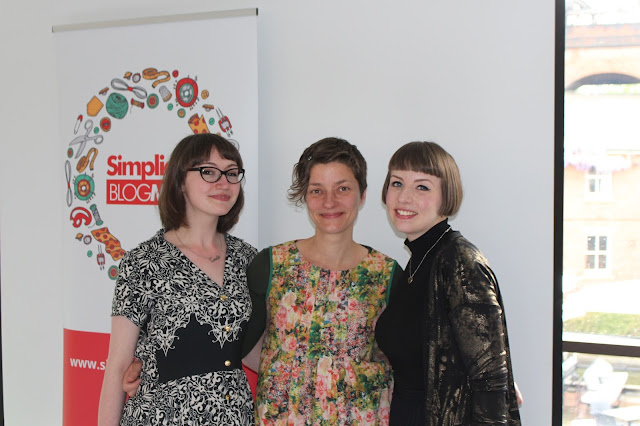
Group shot!
And now a little about The Big Simplicity Blog Meet, which was held in Manchester a few weeks back. Myself, Aimee of Wrong Doll and Angela of Looks Like I Made It had already arranged to meet up in Manchester, and by great chance (fate?!) the event was running on the same day, so we signed right up!

Angela, Aimee and me - so lovely to finally meet!
Cake, goodie bags, fellow sewists and a May Martin masterclass. I'm not sure I was prepared for the amount of wisdom that May was about to impart - I had to steal a bit of paper off of Aimee to jot some tips down! From overlocker tips, to sewing with jersey and turning straps; May not only seems to know it all, but she has an insanely great tip for everything too. She's knowledgeable, witty and very honest - May said she couldn't endorse anything that she wouldn't be happy to use or teach with, with a rather interesting reference to a certain brand of sewing machine that Patrick just so happens to front...

Invisible zipper tutorial!
Anyway, here May is, showing us all how to sew the neatest and quickest invisible zip of all time. I ran straight out to Abakhan after and bought a skinny piping/zipper foot - the piece of kit I'm missing that's prevented me getting an up close finish on the bottom of my zips for all these years!

Goodies and Abakhan haul
We were lucky enough to get a fab bag of patterns, goodies and reading material at the end of the day too. I also grabbed some ridiculous but wonderful snake skin effect faux leather from Abakhan too (May recommended Scotch tape of the machine foot for sewing faux leather!).

For a much more comprehensive run down of May's brilliant tips and advice, see Aimee and Angela's great round ups of the day.

Thanks Simplicity for hosting such a wonderful event!


Stay in touch!


Fitting a blouse - oh the antici......pation!

I shouldn't have strayed into the craft/haberdashery department when I went to John Lewis last week. The beautiful fabric drew my in though, particularly the special edition 150th anniversary fabrics. They only have a few for sale online and I didn't take pictures unfortunately, but they were so many bright colours and amazing retro prints. And of course I saw one that I 'just had to have', though at £18 per metre, I have to admit it was a little (a lot!) out of my budget :( After a momentary sulk, I decided on a compromise between the fabric and my purse and bought a small amount, enough to make a pretty jazzy collar. 


I came home with 0.3metres of fab pink/purple wiggly line 100% cotton. After the success of my first Simplicity 2154, I thought this would be perfect for a collar on the second attempt. Then came the DILEMA: what colour do I make the blouse?! I went to B&M Fabrics based in Leeds Kirkgate Market (if you live anywhere near Leeds GO!) and ended up buying two colours: a perfect pinky/purple match, and a majorly contrasting minty green.

After some nail biting decision making, I decided to go all out and make it in the contrast green. I had a vision of it looking all lovely and retro, maybe a bit fifties, but when I started cutting and stitching the pieces together, I had a moment of 'oh no'... I was going to look like I was putting my scrubs on to go into theatre. Hello Dr Frank-N-Furter, unexpected and accidental sewing inspiration - just let me grab my pearls and a pair of pink Marigolds...


I  made a serious effort to tack everything first this time, and the overall finish was much neater. The fit is probably a bit off though, hence the doctor's scrubs comparisons. I can't believe it's took me so long to realise that a little bit of pattern can subtly disguise all manner of sewing sins and fit issues! The fabric I used for the last version was a bit thinner so the blouse sits better, especially when tucked in, and the pattern of it diverts attention from any dodgy bits. But in when made in a block colour (minus the collar), I'm really noticing the excess fabric around the waist.


Trying to get the fit spot on was actually a really good challenge, and it means that both my Simplicity 2154 blouses will have a different look to them - it's not my uniform you know!

I did the alterations the way I thought best, which involved lots of trying the blouse on inside out and pinching and pinning at the darts. It was mainly the front two that I was concerned about - they needed taking in a bit under the bust in order for the fabric to skim over the bust/waist area better. I measured and tacked both first to make sure everything was even and I'd not completely distorted the shape of the blouse.


Once I'd done that I thought why stop there with the adjustments?! The improved fit on the body actually made the shoulders look a bit out of balance, so I unpicked the arm facing (the bit that you press towards the inside for a neat finish) and restitched it an extra centimetre in - much better. They also got a top stitch after the photo below, so it sits nicely in place. I attached the collar, and taaa-daaa, I no longer look like an I'm heading to the theatre (or the lab)!


I never thought I'd get into ironing, but the sewing thing really forces you to! It's quite satisfying to press all those darts into shape and get rid of all the creases from squashing it through the sewing machine. And I did a proper hem this time - no bias binding cheats - so a blast a steam was pretty much essential to turning it up.


And it's done! I think I finally got it to fit my retro vision. I left the bow out for now as I wanted it to look a little different from my last version, and I quite like it as it is, nice and simple.


There's even a subtle nod to Dr Frank-N-Furter at the back fastening with a couple of pearly buttons - I managed to get this bit to sit spot on this time hooray!


It's already had quite a bit of wear in the sun. Now what should I make next..?


A bloody big bow (and the Simplicity 2154 blouse behind it)

bow
If you walk past me in the street, you'll probably see the bow before you notice me, because I finished the Simplicity 2154 blouse. I had great fun with the pattern and love pretty much everything about the finished garment - I'd wear it every day if I could!


It was frantically finished on the morning that I wanted to wear it. I spent my train journey picking out all the tacking and basted stitches and did a bit of a rush job with the zip. I was in such a rush to get leave the house that I didn't get chance to take a picture of it. So the first picture of me in my dream blouse ended up being a badly-lit, slightly tipsy toilet selfie (sorry!). I cropped the toilets out for everyone's sake, but my elbow does seem to be resting in one, that's just my natural stance...


And sshhhhhh it's a secret, but it wasn't actually finished - I didn't have time to hem the blouse, very bad of me I know, but it was tucked in so who was going to notice?

After it's first wear, I finished the hem, did a few adjustments and took some proper photos:


THE BOW: It's big, so big it overshadows the blouse, and probably me, but I don't care because I LOVE IT! I can totally understand why both Bimble and Pimble and Handmade Jane chose not to interface their versions, but I really do love the structure it's given mine, and it also sits really nicely when worn with a cardigan. I used medium weight interfacing rather than light weight, and the bow sits a bit differently to how the pattern intends it to, but that's fine by me. I'd suggest skipping the interfacing altogether though if you wanted more of a drape on it, particularly if you're using a 100% cotton that already holds its shape quite well like this one.


There's no underestimating the amount of satisfaction you can get from a tiny button. I managed to find the perfect little retro match for the blouse. The back had a bit of a tweak after the first wear - it didn't quite sit right at first, so I got my flatmate to do a temporary safety pin fix. I ended up just moving the button over so there was a slight overlap at the top of the back opening. I was also meant to make a thread loop for the button, but I was being lazy and opted for an elastic loop instead. The thread loop is one to try in the future though - I'll be following this tutorial when I get around to making one.


And here it is worn with my denim Sewing Bee pencil skirt, and my pale and holiday-ready limbs. I made a straight size 14 with no adjustments, and although it fits perfectly on the bust, there's a bit of excess fabric around the waist. Luckily, I tuck most things in anyway, and the high waist of the pencil skirt works great. I had been a bit uncertain about having a zip in the side, but it's lapped and barely noticeable. I might consider putting one in the back instead to give a bit more flexibility with adjusting the side seams, but I should probably just pluck up the courage to take in the darts instead.


I've been planning the next version(s) already. I'm thinking of making a couple of simple collared versions without the bow, to have as throw-on wardrobe staples. When I'm a bit more confident with different fabrics (and hopefully have a better sewing machine) I'd like to try it in a thin, body-skimming fabric with a better drape too! 

But for now, goodbye from a very happy me and my bow!

'The emergency exits are located here, here and here...'

Arghhh, I've done it, I've started the DREAM BLOUSE!

I spent soooo long trying to pick a fabric that was just right. I went to the shops with red-spots-on-white in mind, a bit like an inverted version of Handmade Jane's lovely version which can be found here... but no success. So I just went all out and bought this incredibly retro 100% cotton - scroll down for a closer look. I'm probably going to end up looking all retro air hostess like the model on the cover of the pattern, but oh well, I think that's a look I can handle.


I behaved like a very studious little dressmaker and read all of the instructions before beginning. It's a good job as well, because you had to fold RIGHT sides together when cutting out the fabric - that's not something I've come across before, it might not have made too much difference anyway, but I followed it word for word.


Then came the boring, time-consuming bit - transferring all of the pattern markings. Lots and lots of dots, a fair few darts, and notches galore.


Then the sewing... which so far, has been pretty straight forward. Me/my machine struggled a bit with the more complex front and back darts. Part of this is because my machine is a mini Janome for beginners. It really struggles with taking up fabric/gripping it properly, making it much harder to sew in straight lines, hummppphhh. The other part is down to me - I pinned my darts but didn't tack them into place and now they're a bit wonky. Lesson learnt, tacking is imperative and I'd better not get too big for my boots now.


All being said with the darts, it doesn't actually look too bad at all! I've just pinned the collar into place on this picture to give an idea of what it will look like. There's a neat little opening in the centre front seam just above the bust, and one at the back, which will fasten with a button and loop. It also has a side zip, something I completely didn't realise at first (didn't read the instructions that well did I?!) so I had to make a return visit to shops to pick one up.

But now for the BOW! Ohhh the bow <3

Collar me beautiful...

I LOVE collars. From the most basic Peter Pan to the stand out quirky, weird and wonderful. And I'm thinking of the Vivetta ones when I say quirky... oh if only I could afford you hands collar with red nails!


I made this simple Peter Pan collar a while back using a pattern from the Elegant Musings blog. It's a fab stash buster and a speedy little project - I didn't even bother adding the button and loop, I just use different brooches to pin it in place. You can download the free pattern and follow the tutorial to make your own from here.

Inspired by this love of collars, I did a bit of Pinterest searching and I saw this blouse and fell in love with it instantly. I clicked straight through to view the post on Amanda's blog, Bimble and Pimble (which is fab by the way). But my mind was set before the page loaded... Simplicity 2154 was my DREAM BLOUSE and I had to make it.


I internet shopped the pattern and a few days later, voila - perfect-vintage-inspired holiday-blouse-to-be landed in my letterbox! The skirt, jacket and cardigan patterns are a bonus and I'll definitely be saving them for winter.


I'm a bit nervous about using a more complex pattern - yeah I know, it's ironic when it's called 'Simplicity', but I've got so comfortable with the super simple Sewing Bee patterns! I think it's about time to step up my sewing game with a bit of a challenge though. Watch this space...

P.S. Happy book release day to Tilly Walnes of Tilly and the Buttons! Can't wait to head out and buy Love at First Stitch and get making!

Thanks for visiting!

Thanks for visiting!