Tilly and the Buttons Martha dress

I've already made one wedding outfit in the last month, so I'm glad I had time to squeeze another one in (the first make in my new sewing space!) to wear to my lovely friend Jennie's wedding at the weekend. I had the pleasure of meeting Lucy from Sew Essential back at the Big Simplicity Blog Meet, and she was kind enough to send me a copy of the Tilly and the Buttons Martha pattern and some of their gorgeous fabric - perfect for an *occasion* dress. 

Tilly and the Buttons Martha in John Kaldor Cassandra fabric from Sew Essential
They stock a huge range of beautifully patterned and drape-y fabrics (my favourite types - see them all here!) so it was difficult to choose just one, but this lush John Kaldor Cassandra crepe de chine definitely doesn't disappoint. 
Martha and John Kaldor fabric - best combination!
They have a great range of patterns to pick from too - from the 'big' pattern companies to some of the indies - so it was tough to choose a combo, but I was pleased when Lucy suggested that the John Kaldor fabric and Martha would work well together. When the Martha pattern was first released, I thought it wouldn't suit me, but I think the fabric gives it a slightly different edge - or at least makes it feel a bit more 'me'. I love the pattern packaging, and as ever with Tilly's patterns, I cannot fault the excellent instructions, tips and visuals. 
Just some of my pattern pieces ready for cutting!
I thought I'd have to do an FBA, but my measurements weren't wildly out of proportion - particularly when you take the finished garment measurements into account too. I went with a size 5 for the muslin, and the proportions sat really nicely everywhere, but just slightly too big, so for the final version, I cut my pattern pieces down to a straight size 4.  

The construction of the Martha dress is fun, and straightforward. It's a bit more of a meaty project - there's quite a bit of stay stitching and lots of seams to tidy up - but it's worth investing the extra time for the lovely finish. I think it would also be a great project for building confidence with certain techniques if you're fairly new to sewing. I still lack a certain amount of confidence in my fitting skills - I had 'the fear' it would be too small - so made a few fit adjustments during the make to give me a bit more leeway:

- Used a 1cm seam allowance at the side seams

- Sewed the zip in with the zip tapes lining right up with the edge of the CB 
- And the 'post adjustments' adjustment: Took a chunk out at the waist side seam for a slightly closer fit
A beautiful flowing bias-cut skirt
One really nice design feature of the Martha pattern is the bias-cut skirt, something I've never done before, but a welcome challenge - particularly challenging in the sense that I was cutting out in fairly compromised space! It really does make for an amazing flowing skirt, which particularly in this fabric, has the best drape! I'm also keen to highlight that Martha totally works for those of us who are a bit fuller in the bust too. I was scared I'd look 'all boob' as there's quite a lot going on up top, but the paneling is so delicate and seems less severe than a traditional princess seam or heavily darted garment.
One minor slip up with the iron...
The fabric is slightly lighter in weight than I'd anticipated, and the right side has a slight shine to it which has the potential to be slippy, but luckily it isn't! It was lovely to work with, and sewed up great using regular machine settings and a fine needle - the print is a dream too! A word of caution though... watch your iron settings. I forgot I'd been ironing denim on a really high heat earlier in the day, and accidentally frazzled one of the panels of my very delicate skirt. After a bit of swearing and lots of unpicking, I replaced the whole panel and learnt my lesson - cool iron all the way!


Thankfully everything else was smooth sewing. Good grading and understitching at the neckline/collar really made all the difference with how the dress sits - there's a lot of bulk up there! I decided on my sleeve length at the very end - they were cut at the long length, but I ended up going for a length somewhere in the middle. Tilly also provides the best tip in her instructions: apply a small strip of interfacing to either side of the centre back if your fabric is lightweight, to give stability when inserting the zip. It worked wonders! 
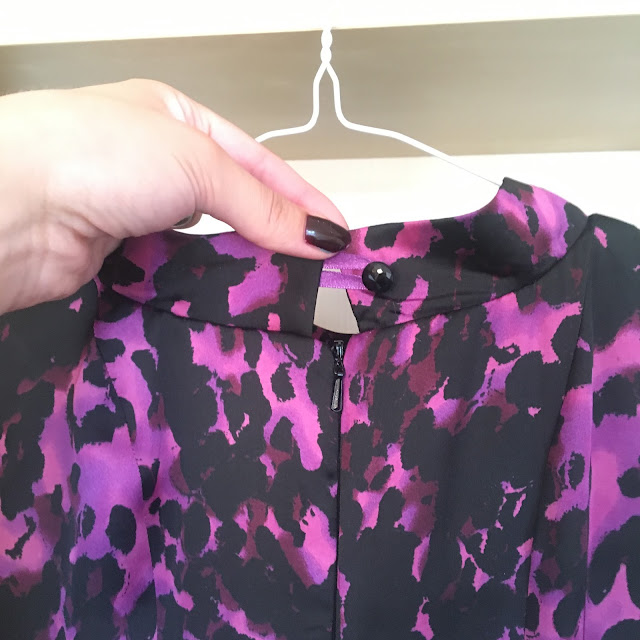
Back detail
So with neat zip and nice matching collar tops, I just had to add the final touch of a little sparkly button. I even managed to find some ribbon in my stash that was a perfect colour-match to use for the button loop.
Thanks, as ever, go to Chris for taking lovely photos
Word got around the wedding that I'd made my own dress and I was the recipient of some lovely comments, as well as some looks of shock and near disbelief (I still find it funny people are so surprised that someone could make their own clothes!). I'm so so proud of it, and it felt fab to wear - plus it's always good to know that you won't accidentally turn up in the same thing as someone else! Thanks again to Sew Essential for the supplies!

In other news, I'm in the market for my first ever overlocker! I'll be starting the hunt at Sew Essential (they stock a range of machines and overlockers too) but if anyone has a model they could recommend please let me know!

Stay in touch!


Thanks for visiting!

Thanks for visiting!