Fibre Mood/Named/Butterick mega jumpsuit

If it isn't the permanent year of the jumpsuit/boilersuit for you, well it certainly is for me (the #sewtogetherforsummer ladies have made a challenge that truly speaks to me)! After the success with my first Fibre Mood Carmella, I started dreaming up all manner of hackable possibilities for the pattern. So here's my jumpsuit mega mash up, starting with Carmella and combining two of my other long time favourite (and also perfectly hackable) patterns.

Carmella jumpsuit hack!
I'll start by saying this was such a no think hack - no big adjustments, just taping my favourite elements of each pattern together. I swapped the slim legs of the Carmella out in favour of my absolute favourite Butterick B6178 Culottes in view D, simply lining up the grainlines/crotches of both pattern pieces. The B6178s have come in handy for a number of hacks (like this one and this one) mainly because they're so easy to just tack onto different bodices.

All my fave patterns pooled
The sleeves come from the Named Clothing Reeta Shirt Dress - again, another pattern that for me, has many miles. The Reeta usually ends up as a shirt for me, and I don't usually favour the turn up sleeves, but when balanced with the volume of the culotte legs, they just seemed right. For ease, I stuck with the existing sleeve head (they didn't differ massively anyway) and just used the length and instructions from the Reeta to create the turn up.


And just a few little details... The inseam pockets of the Carmella are quite shallow, so I mashed them together with the B6178 pockets for extra depth - I mean, phones are getting bigger these days, baby pockets are of no use to me. I would have quite liked to use the chest pockets from the Reeta too, but previous experience tells me they are unfortunately just too fussy for my full bust, so I stuck with the originals.


This was quite a fabric-intensive and fairly experimental project, so I picked out a bargain mid-weight poly-mix with a bit of stretch - it has a bit of a crepe feel/drape to it - for £4 a metre from Lucky Fashion in Dewsbury. I used 3m in total.

Unbelted, it's a bit of a baggy romper!

The fabric is weightier than my previous Carmella, so it's turned out a bit heavier and looser than the last version, but it definitely has the 'secret pyjama' value to it. In all, it's more casual than I was intending, but still easy and versatile to wear and I'm really please that all my favourite patterns came together successfully!


Regardless of how fancy it turned out, I made it to wear to a fancy work event I had to go to on day 1 of this year's Me Made May, and of course, I stuck to it - I was even hand hemming the trouser legs on the morning. I wore it with trainers all day and dressed it up with posh shoes and a bag for the evening do.

Dressing it up!
The sleeve heads need an edit next time. The Carmella has a slight drop shoulder, which the weight and little bit of stretch in this fabric emphasised more than I would have liked. I ended up unpicking the sleeves and sewing them with a really deep seam allowance across the sleeve head, but obviously it's better to have things right from the start, so I'll be giving the pattern a little tweak before the next version.


And yes! There will of course be a next time as I'm a firm believer in sticking with things once you've found something you like. I'd really like to wear a similar jumpsuit to a friend's wedding this summer, but I think the fabric needs to be ever so slightly lighter/more luxe for the occasion. I'm on the hunt the perfect fabric now and have until August. If anyone has any suitable suggestions, please let me know!

Stay in touch!

Fibre Mood Wallys Wrap Blouse

When I said I didn't think I could resist this fabric I was obviously weak-willed and entirely right. It's a silk/cotton mix from Fabric Godmother in the very same snakeskin print as the cotton drill I used for my recent Julien Jacket. The opportunity to sew it up into something lovely arose when I was asked if I'd like to preview the patterns from Fibre Mood's latest Pattern Book (number 4, which is available now)! Having had success with their Carmella Jumpsuit and Tara Jumper, I was very much taken by and happy to try the new Wally's wrap blouse.

Wallys wrap blouse - worn not quite as intended
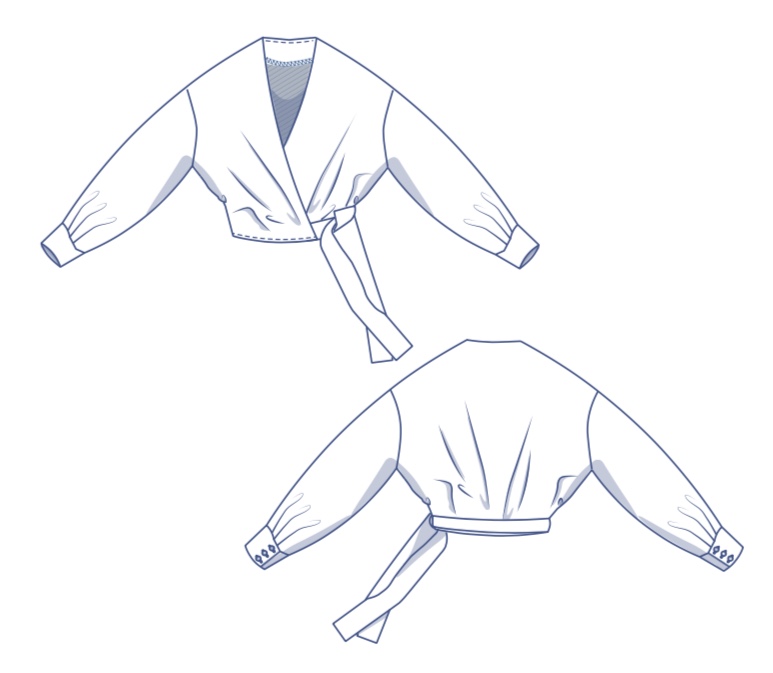
The Wallys is a long and fairly voluminous sleeved wrap around blouse that ties at the smallest point of the waist. I've been wearing my Sayan Blouse quite often, so I thought this would make for a similar, but slightly more relaxed and collarless alternative. What I didn't realise whilst making Wallys is just how versatile it might be to wear. It's worth pointing out that in most of these pictures I've twisted both sides together at the front and looped the ties round the back where they're knotted in a bow - probably my favourite way to wear it. Scroll down for pictures of it worn as intended!

Wallys line drawings
The pattern is available in PDF format, as well as being included in the pattern inserts in the back of the physical magazine - you can also view the instructions for free online before making it by logging into Fibre Mood. I was pleased to see that Fibre Mood layer their PDFs, meaning you can just select and print the size(s) that you want. The only thing that's a bit of a pain is having to add seam allowances, though it didn't take too long overall. I made up a size 40 (UK 12) based on my measurements, but in hindsight, would downsize to a 10 as the wrap style is quite easy-going in terms of fit.


I only bought 1.5m of this fabric as it was quite pricey, and miraculously managed to squeeze all of my pattern pieces out of it - the fabric requirements are given for each individual size: 185cm is the recommended amount for the size 40. I shortened my waist ties by about 25cm to fit them out of the fabric, but they're still plenty long enough!


The make was a breeze and the instructions are easy to follow. I free-styled the ties a little as the pattern wasn't quite clear, but I got in touch with Fibre Mood to check and I've since been informed that it's been updated - I love a responsive and helpful pattern company! Essentially you insert the two ties in between the front blouse and facing on each side.

Back view
Sleeve details and vintage buttons
I always dread cuffs and sleeve slits for no real reason, but these were really straightforward to construct. You'll notice a fair few tucks in the sleeves, which gives them quite a bit more 'puff' than I'm used to. Even though the fabric is soft and light, it holds the shape and volume of the sleeves really well. I never really caught onto the big sleeve trend, but maybe this is the garment that will help me embrace it?

Wrapped as intended!
Whilst it was a lovely make and is a really beautiful blouse on the hanger, there's something I can't quite put my finger on about this look as a whole. I'm wearing the Wallys with my DP Studio Le411 skirt in these pictures, but it's definitely going to take a bit more thought to style it and balance out the volume for day-to-day wear. The sudden burst of warm weather and my aversion to summer dressing might also be coming into play here - maybe I just need a bit of time (and more sun!) to get used to it...  What do you think?

Ways of wearing Wallys
Here are the ways of wearing Wallys that I've explored so far - definitely more options than I bargained for! I'm actually quite into it as a little throw-over summer layer like the middle picture, though I think I might need a summer holiday to make the most of this style! 


If you fancy making your own version of the Wallys blouse, or a whole collection of stylish/on trend garments (the Vienna Dress is on my list!) then I'd recommend picking up a Fibre Mood Pattern Book (you can do a digital browse of them here). I have numbers 1 and 2 and they're great value for money, as well as an aesthetic treat!

See some of the other patterns from the latest edition, made up and shared by makers as a part of Link Party #8

Stay in touch!

Fibre Mood Carmella Jumpsuit

I can be guilty of shying away from intricacies of shirt making, but when I go for it, I definitely don't do things by halves! I combined the opportunity to test some lovely fabric with putting my shirt sewing skills (and more) to the test for my first post as a part of the Minerva Crafts Maker Team!
Finished Fibre Mood Carmella Jumpsuit
You can read all about my experience sewing the Fibre Mood Carmella Jumpsuit over on the Minerva blog now! Check it out here.


Hope you like the finished thing as much as I do! Thanks Minerva Crafts for providing the fabric for this project.

Stay in touch!

Fibre Mood Tara Ribbed Jumper

Can you believe that my first knit took me almost a year to complete and this one took less than a month? Yes, I've discovered the power of super chunky yarn! No it doesn't make me a better knitter, but it does make me faster, and seeing my knitting grow at speed gives me even more motivation to see it through to completion (plus I'm learning lots of new techniques on the way)! Here's the Fibre Mood Tara - my second knitted jumper and the second make of my #2019makenine.
Finished Fibre Mood Tara jumper!
Fibre Mood are a fairly new-to-me pattern company that offer both sewing and knitting patterns via their website and their aesthetically impressive and cooly styled pattern books. You can access some of the patterns for free online in return for signing up to the Fibre Mood website - the Tara Ribbed Jumper being one of them - buy individual patterns as PDFs, or purchase the pattern books which come with folded paper patterns in the back. 

The Tara styled with some incredible trousers in pattern book 1
The Tara looked like a fairly easy second knit with lots of garter stitch and stocking stitch, but slightly more challenging than my first, which was made up purely of squares/rectangles. The sizing is a little limited, with only XS, S or M to choose from, so I went with the size M (40-42) as I wanted it be oversized. I picked this Drops Eskimo super chunky yarn in Olive from Wool Warehouse. The low price and huge colour range made it pretty appealing, plus it's 100% wool. After using a Wool and the Gang kit last time, this was my first attempt at pairing yarn with a pattern. Luckily my Mum is an expert knitter so she could check I'd made a good choice and help me to calculate the yardage!.

Drops Eskimo in olive

I'm by no means an expert, so can't talk at length about the standard of the instructions or compare it to many other knitting projects, but I can tell you the things I learned along the way! First up was the Italian cast on method, which I found out is really good for ribbed edges. I've since used the same method to cast on a double-knitting ribbed hat I've made so many times and it's made a huge improvement!


Casting off the shoulders/top of the sleeves together was totally new to me too and made for a really professional finish, plus it reduced the amount of sewing up at the end. I learnt how important it is to do this loosely so not to restrict the movement or fit of the jumper - I'd probably try to cast off even more loosely next time!

Shoulders cast off together

Just the mention of crochet fills me with dread as it's one of the only crafts I feel like I've never really tried to learn, so I wasn't too keen at the suggestion of doing a slip stitch finish around the neckline. I didn't really understand the instructions, but after watching a couple of YouTube tutorials, it seemed to make more sense. It was actually quite easy once I got into a rhythm and it really neatened the finish of the neck. It's probably worth saying that I referred to YouTube a lot throughout this project. The pattern does include a glossary/explanations of some of the techniques used, but I personally found them difficult to visualise without the help of a video tutorial!

Slip stitched neck
The full jumper took 10 balls of yarn and I used every last bit, even ordering an emergency ball when I got the 'fear' near the end. I realised I wasted quite a lot of yarn when finishing one ball and joining in the next, so I think that's something I could work on improving with my next knitting project. There were LOTS of ends to weave in, but I found it to be surprisingly therapeutic!
Worn with my faux leather Ready to Sew Juliet
Whilst I really like my finished Tara Jumper, I would say that it's a lot less oversized than I expected based on the images in the pattern book - the model is very slim I guess, but even the sleeves look longer on her! My tension was fine, so I wonder if knitting it on slightly bigger needles in future would be ok (the instructions suggest using 10mm needles, 8mm for the ribbing). I'd also consider knitting it on circulars next time just because of the sheer volume of stitches on your needles when you increase the stitches for the sleeves.

Back view

Overall, the Tara was fun and interesting to knit and it's great to wear. At £21.95 for a wool jumper I think it's turned out to be a real bargain and has totally squashed some of the misconceptions I had about knitting being way more expensive than sewing - phew that it can be done on a budget as I don't think my bank account could support another expensive crafty hobby! I've already cast on my next project using a different colour of the Drops Eskimo yarn and would definitely recommend it and the Tara Jumper as a good starting point for fellow novice knitters!


I can definitely see the benefit of having a knitting project on the go at all times now and I've started saving some of my favourite patterns to Pinterest. Do you have a knitting pattern that helped you to learn the ropes? Please leave me your suggestions below so I can add them to my knitting plans!


Stay in touch!


Thanks for visiting!

Thanks for visiting!