PJ Harvey inspired pattern hack

All of my recent makes have had musical ties - either made for a musician (more on that in a future blog post) or for me, with a musician in mind - and this one's something I've had saved up in my head for a while. It's a Kielo Wrap Dress pattern hack inspired by PJ Harvey's stage outfits for her latest round of shows - think black, navy, drape-y, layered, flowing fabrics. When we saw her earlier in the year, she was fab, but in all honesty, I spent her whole set distracted by thoughts of how I could recreate the dress she was wearing. This is what I came up with...

A Kielo Wrap Dress pattern hack!
And here's the inspiration for my slightly less 'stage-y' version...
PJ Harvey at Primavera Sound 2016
If you're a regular reader then you'll know that I've made the Named Clothing Kielo Wrap Dress many times - this one's my favourite! - so it made sense to use that as my TNT starting point. I altered the shape of the dress first to cut my base pattern, and then cut a second longer front and back piece to get the layered effect. This meant that my pattern pieces looked something like this:

Base and overlay pattern pieces - I also cut two waist ties (not pictured)
I skipped the back darts, and removed the big triangles that wrap around the waist - you can see them folded in on my pattern pieces - by straightening the side seams from the armhole downwards. The base dress is cut just above knee length (this was a bit of an accident as I wanted it slightly longer) and the overlay pieces are midi length, and slightly wider as I included an extra 1.5cm allowance for hemming the side seams.

Base pattern pieces
First up, I hemmed the sides of each overlay piece, as I wanted them to hang freely and separately during wear. This also means that I can style the dress differently - e.g. belt one overlay piece in and leave the other to hang loose - but more on that in a bit! I sewed the bust darts on both of the front pieces as normal. Then I basted the two back pieces and two front pieces together at the neck lines, shoulders and arm holes.

The finished side seams of the dress
I stitched the shoulder seams together, treating the basted base pieces and overlays as one. I sewed the side seams of the base dress, being careful only to catch the overlay sections in at the very top, just under the arm opening (see the picture above). The dress has waist ties inserted into the side seam like the regular Kielo does.

The finished dress, worn with the front overlay half tucked in the waist belt
I added a little extra to all of the edges when cutting as the Kielo has a small seam allowance (1cm) and I knew I'd be working with a bit of extra bulk due to the layers. I could only turn the neckline under once due to the bulk, but luckily my fabric didn't fray one bit. It's a black, poly/synthetic, slightly sheer, one way stretch, with a bit of a shine to it - the sort that fills me with dread after a difficult experience working with something similar when making the Driftless Cardigan. In the end I got on just fine using the finest needle I had and a walking foot.

Strange draping from the back seam, we'll call it a design feature...
I really love that the finished dress can be worn in so many different ways - something I hadn't really considered when working out the original concept. There's the fairly conservative day dress, the 'high fashion' tent, the 'little bit PJ Harvey/little bit Vivienne Westwood' look(s). There's also an ever-so-slightly 'Strictly Come Dancing' look when you wrap it some ways - I think this might be the sheen of the fabric, and yes, I'll probably be avoiding this look!

Just some of the ways the dress *could* be worn
I'm thinking of wearing it to a September wedding, which feels very prepared for me - I was sewing my Martha dress and culotte jumpsuit right up until the last minute for the other weddings I've already been to this year. It's also a good thing that I'm prepared for once, as I'm very lucky to be off to Chile with work this week, so I'll be spending a bit of time away from my machine (*sob*).

A windy outtake - I definitely has the desired movement!
I'd be interested to know which way people think the dress looks best! Please leave a comment and let me know :)

Stay in touch!


Kielo Wrap Dress

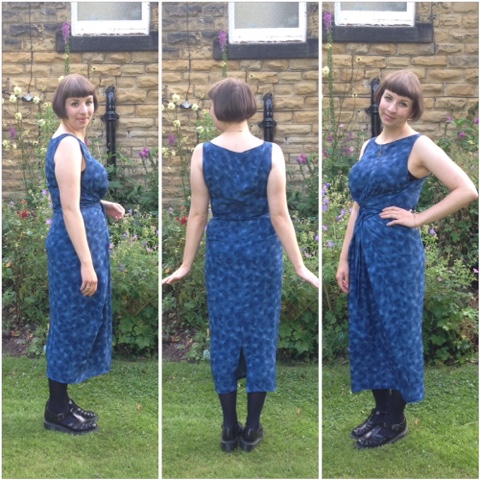
I've been doing a lot of thinking about the ready-to-wear clothes that I like - garments with interesting silhouettes and directional shapes from places like COS and &other stories - and then I wondered why I don't often make things in these styles. The Sea Change Top was a good intro to sewing in a different style, but after making the Kielo Wrap Dress by Named, I think I've really found my feet.


I'm going to go all out and start by saying, I think the Kielo Wrap Dress might possibly be my favourite pattern EVER. If life had to have a uniform, this would be mine - I'm already planning version number 2 (and there'll probably be a version 3, 4...). I originally chose to make the dress because it's very similar to one of my most loved dresses from H&M, which also has a tie waist, but I think the Kielo actually surpasses it.


I bought the pattern as a PDF and was surprised to find that there were very few pages that needed sticking together. Of course, my joy at this was premature, as I then realised that the pattern pieces overlap in a sort of crazy and confusing Burda way. You have to trace half the pattern, then flip it to find the matching letters for the other half, which isn't all as easy as it sounds when you're working with such large and unconventionally shaped pieces.


Once that was out of the way, everything else was really straightforward. It's made up of 3 main pieces and the 2 laces that are used to tie the dress. There are bust darts and shaping darts at the back, and other than that, it's just plain sewing things together. Zig-zagging all the raw edges took the most time.


The fabric is from a huge amount I bought at a 'fill a carrier bag up for £5' stall at the last Hebden Bridge WI Rag Market. I cut a straight size 12, and then had a slight panic about the bust measurement being too small. Luckily it fits just right. The bust darts come from half way up the arm hole opening and point downwards, which gives shape in more fitted arm/neck area of the garment. The waist it completely loose so you can make it as tight as you want to wear it using the ties.


I was a bit worried about hemming the neckline and armholes as the dress only has a 1cm seam allowance. Because of the squeeze on the bust measurement, I really didn't have any extra to play around with, but I managed the narrow, twice folded under hem just fine. The pattern instructions don't suggest it, but I'd probably try to do the same narrow folded under finish on the back vent too, to conceal the raw edge.


I had to do a fair bit of shortening. The pattern is designed for the average height of 5ft8". I'm not far off it at 5ft6" but I was walking all over it! I didn't quite want it to be maxi length, so I cut 7" off before hemming it (quite generously). I purposely did it to a quite awkward length - neither midi or maxi - but I think I like it. After wearing the dress, I found that I also had to open the back vent up by another few inches too so I could take normal sized steps.


I really like the dress, both as a light summer item and a dress for layering with. It's already my go-to dress, so I'll be making another one very soon.

p.s. Thanks to Chloe for taking pictures of me in the garden

Thanks for visiting!

Thanks for visiting!