An inbetween-projects Lottie

As a brief interlude to all the Love at First Stitch sewing I've been doing (see my latest, the Megan dress here) I've had a go at something that was familiar, but also a little bit different. I've made the Simple Sew Lottie blouse before, but this time I made it as a gift for somebody else. 


I made this Paisley version for my oldest friend's birthday - by oldest I mean I've known her for longer than any other friend, she's not that old! Its quite an easy, loose fit so I thought it would be a pretty safe option, as I've never made a garment for someone else before. I picked a colourful, drapey viscose, and I think its worked pretty well.


The matching bias binding that finishes the front of a neckline was a it of a bitch to make in the viscose. There were many expletives uttered and a few burns along the way as it just WOULD NOT PRESS, but once I got over that, it was quite quick to finish. I love the finish of the matching bias binding though, so I am considering getting a bias binding maker and trying this technique out a bit more.


This time, I changed the way that I attached the neck tie. If you follow the instructions, you end up with the raw edges that constantly try to escape from their place - tucked under the neck tie - when the top is worn. I attached the neck tie as if it was a waistband, sewing it to the blouse with right sides together and pressing the inside seam allowance under, before folding it over and carefully slip stitching in place. This worked like magic and gave a much neater and more professional finish.


I did buy enough fabric to make myself a second Lottie - of course - so I will definitely repeating this trick with the neck tie.

Anyway, here it is all wrapped up (with another present too). I hope she likes it!


A Modified Megan

In between hen dos, birthdays, weddings and babies (it's been a busy month!) something very exciting happened... I got a new sewing machine! I've been looking for the right one for a while, and I've finally upgraded from my little Janome half size to a grown up Janome model, much more appropriate for the amount of dressmaking I do.  


Having just finished my first project on the new and improved machine, I can't quite believe how I managed with the half size DMX100 Petite for so long. I'd recommend it for small crafts/bunting/etc, but the new machine is so much better for more complex projects. I feel like my sewing skills have improved no end - the things that technology can do eh?

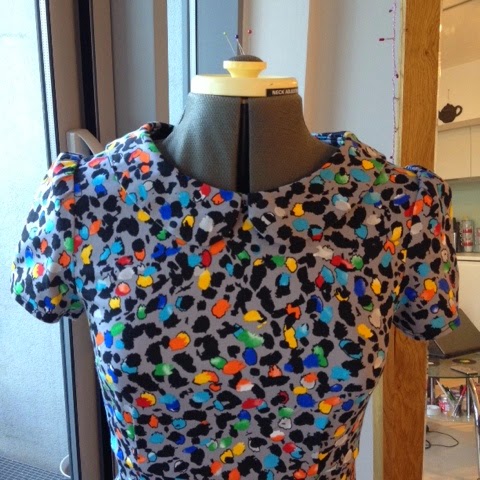
A new machine called for some fancy fabrics. I bought these two in the John Lewis clearance, and although they weren't that cheap by my standards, it was totally worth it for the quality. The top one is called 'Modern Animal' - ooo-er. It's a 97% cotton, 3% spandex mix and absolutely perfect for making the Megan dress from Tilly Walne's Love at First Stitch


Using an unfamiliar machine and such lovely fabric meant that I couldn't really get away with not making a muslin. If you read my earlier posts, you'll probably know that I haven't got a lot of patience for that sort of thing, despite having a ridiculously out of proportion bust measurement that usually requires some sort of adjustment. I'm quite glad I made a muslin in the end, as I did have to make some small changes. The dart tucks under the bust actually work really well, but on me they sort of got lost in the wilderness of the under boob - see unflattering picture below, not great! - so I added an inch to the length of the bodice, bringing them a little bit closer to my waist.


The machine came with loads of different feet, I actually had to consult the instruction book to work out what I was doing! Once I'd got my bearings though, it was pretty simple. And I've now got the best finished seams around, thanks to the overcasting foot, which is pretty amazing! It lets you run a zig zag stitch right at the edge, and has a little notch to guide you down the fabric. I'd say this is the best way to finish a seam if you haven't got an overlocker - I haven't stepped up my game quite that much yet. 


My housemate suggested I modify the Megan dress to make it a bit more 'me' by adding a collar. There were times in the making where I wish I hadn't done this, but now it's finished I'm really glad I did. I drafted a peter pan shaped collar pattern which was roughly based on the Elegant Musings one that I spoke about here. I then basted it in place at the neckline, and sandwiched it between the facing. The fabric is pretty thick anyway, so no need to interface the collar. I was worried about the extra bulk, but some clever grading just about sorted it out. 


I had quite a big issue with fit when it came round to inserting the zip. I think it was in partly down to the fabric having a little bit of stretch, but really it was just a bit too big. Much to my despair, I had to spend an evening unpicking my beautifully inserted concealed zip - first one with a zipper foot too! - and cutting a good couple of inches off  at the centre back seam. The collar caused me great annoyance in this too as it ended up being too long for the corrected back seam. I ended up having to cut a fair bit off of that too, finishing it by folding the raw edges in and top stitching it closed.


I was very determined with this one though, and once I had the zip back in, I just knew I'd got the fit spot on. It was definitely worth the effort. The final push was setting in the sleeves. They have little gathers on the top, which made it a little bit tricky to sew, but definitely not unmanageable. I think they absolutely make the dress too, I love them.


And so finally, here's what I'm going to class as my first venture in to real-life, adult sewing machine, dressmaker territory: my finished, and slightly modified Megan Dress.


I've sang the praises of Tilly's patterns before, and the only difference with this one is that I probably love it a little bit more! This is the sort of dress that I want to wear all the time - when I'm at work, when I'm out for drinks - it's just fab. I'd recommend it for anyone, from beginner level to the advanced sewist, and as a bonus, it actually takes very little fabric - I have loads of this John Lewis stuff leftover to stash, which is definitely not a bad thing as I am very fond of it!

Next up, and still working my way through Love at First Stitch, is the one I've wanted to make for ages, and that is the Mimi blouse. Bring on the button holes!


Thanks for visiting!

Thanks for visiting!