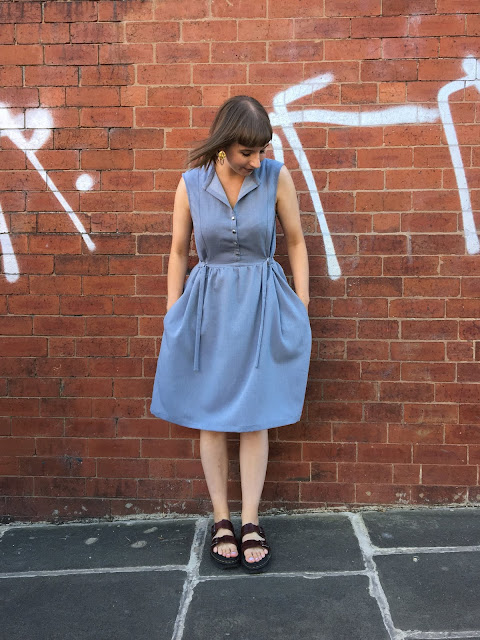
Cocowawa Honeycomb Dress

Thursday, August 09, 2018

The lovely Ana of Cocowawa Crafts kindly asked me if I'd like to join in with the Honeycomb Blog Tour wayyyy back in February (incredible planning skills Ana!) before the Honeycomb was even released into the world! I'd never sewn a Cocowawa pattern before, so thought it would be a good opportunity to try out a new-to-me indie pattern company. I also really liked Ana's idea of spreading out the Blog Tour to show the potential of the Honeycomb right through until the Autumn/Winter as it's a really versatile pattern. Here's my own summer version of the Honeycomb Dress!

Cocowawa Honeycomb Dress
I have to be up front and say that the Honeycomb is much cuter and more feminine in style than I'd usually go for. I spent a long time hunting for a suitable fabric to 'toughen' it up. I was hoping for a cool, minimal graphic print, but they're always so difficult to come across. I'm getting close to attempting to print/paint my own (very much inspired by the recent efforts of @dfabricater), but I'd honestly rather just buy it ready made! If anyone has recommendations for sourcing some graphic goodness, please let me know!

Hardware hack!
After accepting minor defeat on the fabric front, I plumped for some stash busting with this plain but nice quality drapey cotton-mix that has the look of lightweight denim. I thought the solid colour would really show off the silhouette of the dress and I exchanged the bows for a little hardware hack to make it a even more minimal. I cut the long ties at twice the original width to fit my 1" D rings, and made short tabs to attach the hardware between the side seams.

Obviously a winner -it has pockets!
I sewed up a size 3, extending the bodice by 1" using the lengthen/shorten lines as I thought it might come up a bit short on me. In hindsight this really wasn't necessary and I would make it as-is in future! I would NEVER normally make a princess seamed garment as I like to avoid tricky fitting in the bust area, but I'm really impressed with the fit! The ties at the waist give you the option to bring the waist fit really close, whilst still allowing for a generous fit in the bust (I'm an FF cup with a really narrow back for reference)!

A bit too much excess in the back!
The lower back has a lot of excess and sits too low for me - mostly my fault for adding too much length, but also not helped by my bust lifting the bodice higher than it should sit in the front. For future versions I'll try on the bodice before attaching the skirt and level out the fit there. I found the neckline just a little too high too, so I tacked the collar out into this open position. I'm quite pleased with it like this and would probably do the same next time.


I sewed my Honeycomb Dress with short sleeves, but it wasn't until I tried it on that I realised they didn't quite work in my fabric choice - it felt a little 'matronly' (for some real short-sleeved Honeycomb inspo you can't go wrong with Marie's fantastic version)! Instead, I cut them off, using the remaining sleeve edge to bind my armholes. I took a big chunk out of the side/under arms - the instructions guide you through this - to get much closer fit in the bodice for the sleeveless version, but my armholes have ended up a little clunky due to the last minute sleeve chop. I'd definitely take more care over the armhole finish next time!
Unfortunately not feeling those sleeves!
The instructions are totally flawless and beautifully designed. Ana's illustrations and steps are really detailed and easy to follow, whichever version you opt for. My personal favourite part of the make was doing my very first burrito method to sew the yoke/bodice/yoke lining together - a fun technique and one I'll definitely try again!

A little bit clunky, but a successful last minute sleeve chop
In all, I'd say that my Honeycomb doesn't quite do justice to such a nice pattern, but my first version will definitely go on to inform the fit and fabric choice of future versions. I'll be sticking with the D rings as I totally love them, but it still needs a bit more toughening up to feel more 'me'. Regardless of this though, the Honeycomb has made for a pretty cool sundress (fingers crossed the weather stays good!) as well as being work appropriate, which is a bonus!


Without really realising it, I've become a go-to trouser person, so it's been really nice to break away from that and try something different, both in making and wearing. I'm inspired by all the fab versions on Instagram to keep working towards my perfect Honeycomb, and I'm confident I'll get there, I just need to work out how to make it 100% 'right' for me - fabric and styling suggestions welcome!
Sun dress in the sun! 
Thanks Ana for encouraging me to sew up only my second dress of 2018 and giving me the opportunity to be involved in the Blog Tour. The Honeycomb is such a sweet pattern and I'd definitely recommend it for all levels of maker - plus there's a great sew along online if you need a helping hand!

Keep your eyes peeled for more versions coming in the Blog Tour - Autumn dressing is my fave, so maybe that's where my dream Honeycomb will be realised!


Stay in touch!


You Might Also Like

7 comments

  1. I think it came out great - I love your own touch of the D-rings which go well with the metallic buttons ;o)

    ReplyDelete
    Replies
    1. Thank you! I'm definitely glad I went with the D-Ring detail :)

      Delete
  2. I think the Honeycomb looks lovely on you! To "toughen" it up, maybe try a nice, light weight, super faded denim or chambray. That way you can still have drape, softness but it will look more bad girly as opposed to just girly :)

    ReplyDelete
    Replies
    1. Thanks Kathleen! And thanks for the great fabric suggestions - maybe it's not about styling it tough, but trying more to make it that way from the start :)

      Delete
  3. Loving your Honeycomb! Especially the D rings at the waist, that's a great idea.

    ReplyDelete
    Replies
    1. Thanks Lynne! The D rings are definitely my favourite bit :)

      Delete
  4. Absolutely love this! I hope you don't mind, but I totally pinched your idea and shared your link on my blog :)

    http://www.jojosews.com/2020/06/a-hacked-honeycomb-dress.html

    ReplyDelete

Thanks for visiting!

Thanks for visiting!